April 2, 2016 | Terraform Provider
When it comes to automating the creation of infrastructure in cloud providers, Terraform (version at time of writing 0.6.14) has become one of my core go to tools in this space. It provides a fantastic declarative approach to describing the resources you want, and then takes care of making it so for you, keeping track of the state in either a local file or a remote store of some sort. Various bits of sensitive data is often provided as input to terraform.

(with a bit of terrahelp from your friends)
[update] 05-Nov-2016 Terrahelp has evolved since this blog was originally written, and although the core approach and principles have not changed, some of the commands have. This blog has now been updated to reflect the commands used as at terrahelp 0.4.3. Blog/textual changes noted in blue.
At a minimum credentials to connect to the cloud provider, but often passwords to configure databases such as AWS’s RDS etc are required as well. Also if you make use of modular terraform design patterns, you will also need to pass these variables through to your modules. Terraform currently stores many of these variables in clear text within it’s state store (terraform.tfstate when local) which is problematic for many reasons, especially if you want to store this file version control as is one of the current recommended approaches. It should be noted that this has been recognised as an issue and is being worked on, however for those already using, or wanting to use terraform now, you need to handle this yourself.
This blog provides details on how you can use Vault as part of an approach to help address this issue. This blog also introduces terrahelp, a golang command line library I wrote to help make this whole process a little bit easier. So if you are having sleepless nights worrying about your unencrypted .tfstate files, read on, this may help!
Broadly speaking there are two high level approaches to addressing the challenge of securing terraform state, namely a local or remote approach. With the remote approach your would delegate to Terraform to store and retrieve your state from Vault directly. Unfortunately native Terraform support for a Vault remote backed is not available (yet) and this blog is not specifically going to cover how to do this. It will however cover how you can use Vault as part of a broader process to encrypt your local .tfstate files which should then mean they can safely be stored in version control or whatever other persistent storage mechanism you choose.
For encryption
For decryption
To demonstrate this functionality I will be using a sample project which is also available as part of the terrahelp source code project in GitHub. If you would like to follow along, you can download the code, including the example terraform project. (This link is to latest example code which at Nov 2016 when this blog post was revised, is based off terraform 0.7.7 features . If you want the specific versions as defined in this blog, i.e. 0.6.14 compatible, please see the 0.4.0 version of the example terraform project. The example terraform project only uses local resources (i.e. terraform templates which display some outputs and values) so you won’t need to worry about incurring any cloud costs if you run the code noted here. Although simple, the concepts translate equally well to being used in situations where you need to use sensitive values for more realistic scenarios like configuring database passwords etc.
terraform.tf
resource "template_file" "example" {
   template = "\nmsg1 = ${msg1}\nmsg2 = ${msg2}\nmsg3 = ${msg3}"
     vars {
        msg1 = "${var.tf_sensitive_key_1}"
        msg2 = "${var.tf_normal_key_1}"
        msg3 = "${var.tf_sensitive_key_3}"
     }
   }

   output "rendered" {
      value = "${template_file.example.rendered}"
   }

   output "normal_val_2" {
      value = "${var.tf_normal_key_2}"
   }
}
variables.tf
# sensitive variables (should be passed in via tfvars)
variable "tf_sensitive_key_1"  {}
variable "tf_sensitive_key_2"  {}
variable "tf_sensitive_key_3"  {}
variable "tf_sensitive_key_4"  {}
variable "tf_sensitive_key_6"  {}

# Non sensitive variable defaults
variable "tf_normal_key_1"     { default = "normal value 1" }
variable "tf_normal_key_2"     { default = "normal value 2" }
terraform.tfvars
tf_sensitive_key_1         = "sensitive-value-1-AK#%DJGHS*G"
tf_sensitive_key_2         = "sensitive-value-2-prYh57"
tf_sensitive_key_3         = "sensitive-value-3-//dfhs//"

tf_sensitive_key_4         = "sensitive-value-4 with equals sign i.e. ff=yy"
tf_sensitive_key_6         = "sensitive-value-6"
Running a terraform apply will produce the following output:
$ terraform apply
template_file.example: Creating...
  rendered:  "" => ""
  template:  "" => "\nmsg1 = ${msg1}\nmsg2 = ${msg2}\nmsg3 = ${msg3}"
  vars.#:    "" => "3"
  vars.msg1: "" => "sensitive-value-1-AK#%DJGHS*G"
  vars.msg2: "" => "normal value 1"
  vars.msg3: "" => "sensitive-value-3-//dfhs//"
template_file.example: Creation complete

Apply complete! Resources: 1 added, 0 changed, 0 destroyed.

The state of your infrastructure has been saved to the path
below. This state is required to modify and destroy your
infrastructure, so keep it safe. To inspect the complete state
use the `terraform show` command.

State path: terraform.tfstate

Outputs:

  normal_val_2 = normal value 2
  rendered     =
msg1 = sensitive-value-1-AK#%DJGHS*G
msg2 = normal value 1
msg3 = sensitive-value-3-//dfhs//
And inspecting the terraform.tfstate file will looks as follows:
$ cat terraform.tfstate
{
    "version": 1,
    "serial": 0,
    "modules": [
        {
            "path": [
                "root"
            ],
            "outputs": {
                "normal_val_2": "normal value 2",
                "rendered": "\nmsg1 = sensitive-value-1-AK#%DJGHS*G\nmsg2 = normal value 1\nmsg3 = sensitive-value-3-//dfhs//"
            },
            "resources": {
                "template_file.example": {
                    "type": "template_file",
                    "primary": {
                        "id": "b2cc7afb65fe7b6ac21328905d82e28fcbcdad1992cefce82cfa91691af24b91",
                        "attributes": {
                            "id": "b2cc7afb65fe7b6ac21328905d82e28fcbcdad1992cefce82cfa91691af24b91",
                            "rendered": "\nmsg1 = sensitive-value-1-AK#%DJGHS*G\nmsg2 = normal value 1\nmsg3 = sensitive-value-3-//dfhs//",
                            "template": "\nmsg1 = ${msg1}\nmsg2 = ${msg2}\nmsg3 = ${msg3}",
                            "vars.#": "3",
                            "vars.msg1": "sensitive-value-1-AK#%DJGHS*G",
                            "vars.msg2": "normal value 1",
                            "vars.msg3": "sensitive-value-3-//dfhs//"
                        }
                    }
                }
            }
        }
    ]
}
As you can see, the sensitive values are clearly stored in plaintext in the file – not great!
Terrahelp is a golang utility I wrote to automate and simplify additional tasks required when working with terraform. Doing local encryption as outlined above is the first concrete functionality it provides. You could achieve a similar outcome using your own bash scripts or any other language you choose, however I am really loving golang, and this problem provided me with an opportunity to solve it using my new favourite language.
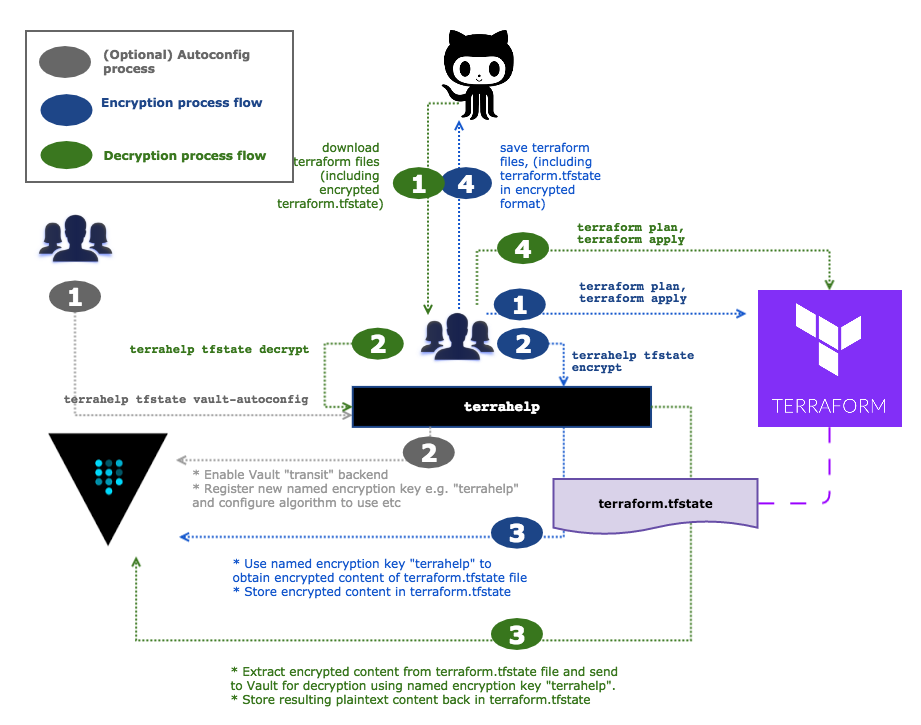
Terrahelp has the ability to use a simple inbuilt AES based encryption provider, however for the purposes of this blog, we are going to use the Vault provider. Below is a diagram depicting a high level overview of how it is used in the context of encrypting and decrypting terraform tfstate files. We will go into more detail a bit later.
You can get a version of the latest binary CLI from here (You may want to add this into your path to make it easier to use), or following the instructions on Github to build from source. In order to check that it is working, just execute the binary without any arguments and it should display the default help for you.
$ terrahelp -help
NAME:
 terrahelp - Provides additional functions helpful with terraform development

USAGE:
 terrahelp [global options] command [command options] [arguments...]

VERSION:
 0.4.3

COMMANDS:
 vault-autoconfig Auto configures Vault with a basic setup to support encrypt and decrypt actions.
 encrypt          Uses configured provider to encrypt specified content
 decrypt          Uses configured provider to decrypt specified content
 mask             Mask will overwrite sensitive data in output or files with a masked value (eg. ******).
 help, h          Shows a list of commands or help for one command

GLOBAL OPTIONS:
 --help, -h show help
 --version, -v print the version
Vault based terrahelp encryption relies on having a Vault server running somewhere. You can quite easily download the latest version from here, then open up a new terminal, and for experimentation purposes, simply run the server in dev mode i.e.
$ vault server -dev -dev-root-token-id="terrahelp-devonly-vault-root-token"
Now you will need to configure Vault so that we can use its transit backend. The transit backend is the feature which provides us with the “encryption as a service”. More about this and how it works later. To get up and running quickly, Terrahelp provides a command (vault-autoconfig) to help make this setup easier for you. Open up another terminal (Vault will be running in the foreground of your last one) and set the following environment variables to point at your Vault dev server:
$ export VAULT_TOKEN="terrahelp-devonly-vault-root-token"
$ export VAULT_ADDR="http://127.0.0.1:8200"
$ export VAULT_SKIP_VERIFY="true"
Terrahelp gives you the option to drive the commands using explicit CLI arguments or environment variables. To make things less verbose, we will use environment variables here. First up we will use terrahelp itself to help auto configure its ability to use the Vault provider for encryption.
$ export TH_ENCRYPTION_PROVIDER="vault"
$ export TH_VAULT_NAMED_KEY="terrablogger"
$ terrahelp vault-autoconfig
2016/03/28 21:45:20 Mounting transit backend ...
2016/03/28 21:45:20 Named encryption key 'terrablogger' does not exist,
creating at /transit/keys/terrablogger ...
Assuming you grabbed a copy of the example terraform project code as described previously, change into the example sub folder. This might also be a good time to download the latest version of Terraform from here and put it on your path if you have not already done so.
$ git clone https://github.com/opencredo/terrahelp
$ cd terrahelp/examples/tfstate-encrypt
Terrahelp’s default encryption mode is to encrypt and decrypt the entire content of any specified files (i.e. terraform.tfstate). Below we explicitly configure terrahelp to use full mode as well as the Vault provider, before proceeding to perform the actual encryption and decryption. For more detailed info, please see the inbuilt help in the CLI.
$ export TH_ENCRYPTION_PROVIDER="vault"
$ export TH_ENCRYPTION_MODE="full"
$ export TH_VAULT_NAMED_KEY="terrablogger"
# terrahelp can use explicit CLI arguments or environment variables
$ terraform apply
# this will generate a standard terraform.tfstate file which will include our sensitive data
$ cat terraform.tfstate
# verify its content (This should be the same as that shown in the Sample project section)
$ terrahelp encrypt -file=terraform.tfstate
# performs full file encryption 2016/03/28 23:43:29 Backuping up terraform.tfstate --> terraform.tfstate.terrahelpbkp 2016/03/28 23:43:29 Encrypting: terraform.tfstate
$ cat terraform.tfstate
# verify its content
@terrahelp-encrypted(vault:v1:+A1xJL0/ziPtzFMUi0YwQmoa4RtMIKlzZE/oxRDqzDoplzUM77d88gHYEQ/
/MxoCwvh1zWS+pawUlWXSV5jRKv6TIzD1c8nMn5Laa ... wPinllmjn4tQz8OK0AHRl33RKCMGNioI7HHQJ4Km3
est6DKR/IIjs1/Blwri egx9Axnq2Fc6s5G27xszD+ ... dgshsj6hdjNYySmlk4PScnLG7hLAcRUUtaRbyRGW/
eYbC8CONTvqhPc48e2ObyJ8kqnQoGuOKNE7HO+wNVhAMtNPv9fKAPtxB4XihVidW8amUdFqpybyyXpLvBA==)
The above can now be checked into version control without worrying about exposing credentials. You may be curious to find out exactly what encryption algorithm was used here, and what that @terrahelp-encrypted(vault:v1 prefix is? All will be explained later, lets first finish off the decryption side.
$ terrahelp decrypt -file=terraform.tfstate
# perform full file decryption 2016/03/28 23:44:23 Backuping up terraform.tfstate --> terraform.tfstate.terrahelpbkp 2016/03/28 23:44:23 Decrypting terraform.tfstate $ cat terraform.tfstate # verify its content # the result should be the same as that shown before the encryption was performed
Although encrypting the whole file is very secure, sometimes it would be nice to only encrypt the portions of the tfstate files that are actually sensitive. This make it easier to eyeball and see what’s going on as well. By switching to inline mode, terrahelp allows you to do just this. The steps involved in doing inline encryption and decryption are as follows:
$ export TH_ENCRYPTION_PROVIDER="vault"
$ export TH_ENCRYPTION_MODE="inline"
$ export TH_VAULT_NAMED_KEY="terrablogger"
# terrahelp can use explicit CLI arguments or environment variables
$ terraform apply
# this will generate a standard terraform.tfstate file which will include our sensitive data
$ cat terraform.tfstate
# verify its content (This should be the same as that shown in the Sample project section)
$ terrahelp encrypt -file=terraform.tfstate
# perform inline encryption
2016/03/28 23:45:29 Backuping up terraform.tfstate --> terraform.tfstate.terrahelpbkp
2016/03/28 23:45:29 Encrypting inline: terraform.tfstate
$ cat terraform.tfstate
# verify its content
{
    "version": 1,
    "serial": 0,
    "modules": [
        {
            "path": [
                "root"
            ],
            "outputs": {
                "normal_val_2": "normal value 2",
                "rendered": "\nmsg1 = @terrahelp-encrypted(vault:v1:nHeslJeQPT1ktvJqLGHOCsytEIm+K9s+1hdAFNxR7qP98BfdlaOGmKu3Ani5UuR5x2bi5+4S3m0B)\nmsg2 = normal value 1\nmsg3 = @terrahelp-encrypted(vault:v1:XxzRCq9AcV0dW0i1wYLms45Xw8jgS3t/ydKmO3j2YTM/16hJ5/blYpLJjcjwvbcIUyO9Aa36)"
            },
            "resources": {
                "template_file.example": {
                    "type": "template_file",
                    "primary": {
                        "id": "b2cc7afb65fe7b6ac21328905d82e28fcbcdad1992cefce82cfa91691af24b91",
                        "attributes": {
                            "id": "b2cc7afb65fe7b6ac21328905d82e28fcbcdad1992cefce82cfa91691af24b91",
                            "rendered": "\nmsg1 = @terrahelp-encrypted(vault:v1:nHeslJeQPT1ktvJqLGHOCsytEIm+K9s+1hdAFNxR7qP98BfdlaOGmKu3Ani5UuR5x2bi5+4S3m0B)\nmsg2 = normal value 1\nmsg3 = @terrahelp-encrypted(vault:v1:XxzRCq9AcV0dW0i1wYLms45Xw8jgS3t/ydKmO3j2YTM/16hJ5/blYpLJjcjwvbcIUyO9Aa36)",
                            "template": "\nmsg1 = ${msg1}\nmsg2 = ${msg2}\nmsg3 = ${msg3}",
                            "vars.#": "3",
                            "vars.msg1": "@terrahelp-encrypted(vault:v1:nHeslJeQPT1ktvJqLGHOCsytEIm+K9s+1hdAFNxR7qP98BfdlaOGmKu3Ani5UuR5x2bi5+4S3m0B)",
                            "vars.msg2": "normal value 1",
                            "vars.msg3": "@terrahelp-encrypted(vault:v1:XxzRCq9AcV0dW0i1wYLms45Xw8jgS3t/ydKmO3j2YTM/16hJ5/blYpLJjcjwvbcIUyO9Aa36)"
                        }
                    }
                }
            }
        }
    ]
}
Notice how only the sensitive values in the above tfstate file have been replaced with an encrypted value. Again before delving into how this is done under the covers, let’s see the decryption process in action, which you may have guessed, is very similar to before.
$ terrahelp decrypt -file=terraform.tfstate
# perform full file decryption
2016/03/28 23:46:23 Backuping up terraform.tfstate --> terraform.tfstate.terrahelpbkp
2016/03/28 23:46:23 Decrypting terraform.tfstate
$ cat terraform.tfstate
# verify its content
# the result should be the same as that shown before the inline encryption was performed
Vault provides “encryption as a service” through a transit secret backend. Terrahelp uses this to ship off tfstate, and fragments of tfstate content to Vault to perform the encryption on its behalf, storing the results back in the tfstate files themselves.
This transit backend is used to encrypt/decrypt data in-transit with Vault never actually even storing the data sent to it via this backend. This is all done by having a named encryption key created and registered with vault (typically by a security team). This named key can be configured to specify what kind of encryption algorithm to use and much more. Teams wanting to have content encrypted, need only know what the named encryption key is (Note I said name not the actual key itself) and then when interacting with Vault, this is used to perform the appropriate encryption and decryption.
The primary use case for the transit backend is to encrypt data from applications while allowing the app to store the encrypted data in some primary data store, in our case probably Git. Why is this cool? It relieves the burden of having to do proper encryption/decryption from those simply using terraform, pushing this responsibility onto the operators of Vault, which typically includes the security team. There are other added benefits including having all encrypt/decrypt operations audited, as well as configuring ACLs as to who has access to the named encryption key etc.The downside however is that you need to always ensure Vault is running and available otherwise you may not be able to decrypt your content!
For more info on the transit backend in Vault please see the documentation here.
One of the questions we previously sidestepped was what encryption algorithm was being used. The answer is “it depends on what the named encryption key was configured with”. When we ran the one off terrahelp vault-autconfig command, this involved registering the a named encryption key with vault. In our case it used the value specified in the environment variable TH_VAULT_NAMED_KEY, namely ‘terrablogger’. If you still have your vault server running the following command will provide info as to how this is configured. You can see that it is using the AES GCM cipher mode and algorithm.
$ vault read transit/keys/terrablogger
Key                   	Value
cipher_mode           	aes-gcm
deletion_allowed      	false
derived               	false
keys                  	map[1:1.45919792e+09]
latest_version        	1
min_decryption_version	1
name                  	terrahelp
You will have noticed that all the encrypted values are of the following format: @terrahelp-encrypted(vault:v1:SomeBase64EncodedEncryptedValue)
Starting from the inside, the vault:v1:SomeBase64EncodedEncryptedValue value is essentially the value returned by Vault. Having had whatever encryption algorithm applied to it, it is then subsequently base64 encoded and returned. Vault has a concept of key rotation, allowing a new version of a named key to be generated. The example above indicates that version 1 of that named key was used for this encryption.
Terrahelp itself then wraps this value with @terrahelp-encrypted(). This is simply to provide an easy way to identify and recognise a Terrahelp encrypted values in files. This proves especially useful for inline decryption as reproducing the plaintext state file is as simple as finding all the terrahelp encrypted values and replacing them with whatever Vault returns.
For inline encryption, terrahelp needs some mechanism to identify the sensitive data within an existing tfstate file. For this, it relies on the user supplying a terraform.tfvars file. The terraform.tfvars is traditionally used to provide “secret” info, primarily for supplying details for provider resources, but has grown beyond that. You NEVER check a terraform.tfvars file into version control. This file, or its content was always intended to only be provided just in time for the terraform process to use. Terrahelp piggy back’s off this and introspects it for all the sensitive values, it then looks for any occurence of these sensitive values in the tfstate files and replaces them with an appropriately encrypted value.
Terrahelp is merely the orchestrator pulling all these various bits together, but essentially, the fundamental approach is quite simple.
This blog tries to provide some insight into how you can use Vault as part of an approach to help address securing local terraform state, something which keeps me, and I’m sure many of you awake at night. It also provides a demonstration of how the terrahelp utility can assist with this. No doubt there is more to be done, and some edge cases probably not be covered, however I hope this post, and maybe the terrahelp utility itself can help you if you are thinking about using Vault as part of securing your current terraform process. Thanks for reading and please do let me know your thoughts!
This blog is written exclusively by the OpenCredo team. We do not accept external contributions.
SHARE


Why should you upgrade your Terraform provider to the latest version of the API
Check out John Sharpe and Will May’s latest blog where they give suggestions for Terraform Provider authors who are thinking about upgrading from SDKv2 to…