Writing your own Kafka source connectors with Kafka Connect. In this blog, Rufus takes you on a code walk, through the Gold Verified Venafi Connector while pointing out the common pitfalls

Everybody has had that moment when they’re put onto a project which requires you to pick up a technology you understand in principle but not in practice. A project, where you spend a large amount of time trying to cobble together an understanding from every piece of code and tutorial to a feature complete version.
I was recently on a project which required producing a Confluent verified gold Source Connector. Whilst there is a variety of information out there on the web regarding how to do this, my search for something to help short circuit my learning, and bring it all together in one place proved unfruitful. This did however serve as the inspiration that has resulted in me writing this blog – essentially providing a brief recap on the key components of Kafka Connect, and then providing a step by step guide how these relate to developing a Source Connector.
I’ll try and cover each main bit with some basic explanations. This will include the Maven Archetype, Source Connectors, Source Tasks, Structs, ConfigDefs, producing JARs for deployment and even a little on some stuff required for verification.
If you already have a basic grounding in Kafka Connect/Connectors feel free to skip to “Developing the Connector”.

Kafka is a distributed streaming platform built on top of partitioned log files. As a platform it provides very powerful processing capabilities, however for many people, it is easier to view it as a simple message bus in the first instance. This of course requires the ability to get data into and out of Kafka.
One of the ways to achieve this is through custom developed Consumer and Producer applications. In that case, you build your own application and bring in the Kafka Client Jars. This is normally done when you’re trying to handle some custom business logic, or when connecting to some external system prior to Kafka Connect being around.
Kafka Connect was added in the Kafka 0.9.0 release, and uses the Producer and Consumer API under the covers. The Connect Service is part of the Confluent platform and comes with the platform’s distribution along with Apache Kafka. Connectors are meant to provide a simple way of connecting to external systems, only requiring a configuration file, while the scaling, distribution and persistence of state is handled by the framework for you. Connectors for common things like JDBC exist already at the Confluent Hub. But what if you need to get data into Kafka from a system that isn’t currently supported? That’s when you’ll need a custom connector. Below, we’ll walk you through how to implement a customer connector developed against the Connect Framework. We’ll be using our existing gold verified source connector as an example.
To summarise, Consumers & Producers are custom written applications you manage and deploy yourself, often as part of your broader application which connects to Kafka directly. Connectors on the other hand, target integration with specific external integration systems, and are provided as Java Jars which either you, or someone else has built, which you then deploy to however many boxes you have running the Connect service.
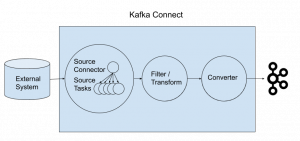
We will only be looking at the details required to implement a source connector, which involves getting data from an external system into Kafka. This is opposed to a sink connector where the reverse takes place, i.e. data is extracted from Kafka and ingested into the external system. To provide context for the code detail we will shortly be covering, we briefly recap the key concepts underpinning Kafka Connectors. These are covered in more detail in Confluent’s concepts guide.
Connectors are built using Maven where an archetype is provided to help you get up and running quickly. This was not obvious to me when I started. Fortunately, you won’t have to make that mistake.
Using the command below you can create the skeleton source code for your connector. You need only change the package, groupId, artifactId and version as appropriate:
mvn archetype:generate -DarchetypeGroupId=io.confluent.maven -DarchetypeArtifactId=kafka-connect-quickstart -DarchetypeVersion=0.10.0.0 \
-Dpackage=com.opencredo.examples \
-DgroupId=com.opencredo.examples \
-DartifactId=my-source-connector \
-Dversion=1.0-SNAPSHOT
The nice thing about the Archetype is that it will create the boilerplate code for your connector, some basic properties and some empty tests. If you want to get an idea of what will be produced, you can look at the template code in the archetype’s github repo.
It also sets up the bare minimum required by the maven-assembly-plugin. This will be useful when you want to deploy the connector, but we’ll go into more detail on this later.
We’re going to walk through the gold verified source connector we developed for our client to explain what’s going on with real code, but feel free to use this as inspiration for your own connectors. For context, this connector connects to the Venafi platform (a cybersecurity platform focused on machine identity protection) and pulls event based information from a REST API into Kafka for purpose of further analysis. More detailed information should you be interested can be found in the blog “Addressing Machine Identity Challenges through Intelligent data”.
If you want to jump to view the end result, check out the links below:
If not, lets begin looking at the source code for our first main component – the class TppLogSourceConnector.java
The Connector class is the main entrypoint to your code, it’s where your properties get set and where the tasks are defined and set up. But it’s a lot less daunting than it sounds. Let’s go through the methods you’ll have to implement.
@Override
public ConfigDef config() {
    return CONFIG_DEF;
}
Source for method config()
The CONFIG_DEF is a static import defined at the top of the class imported from TppLogSourceConfig. I’ll go into the TppLogSourceConfig later on however, the important thing to know for now is that this is how we expose what properties the connector cares about – e.g, a username and password.
Source for method start(Map<String, String> props)
    @Override
    public void start(Map<String, String> props) {


        log.info("Starting up VENAFI Log Source connector");
        try {
            configProperties = setupSourcePropertiesWithDefaultsIfMissing(props);
        } catch (ConfigException e) {
            throw new ConnectException("Couldn't start TppLogSourceConnector due to configuration error", e);
        }
    }
When setting up your connector, this is one of the first methods to get called. Here we set some internal state to store the properties we got passed by the Kafka Connect service. (By way of an example, the type of properties you can set for the Venafi connector includes your username i.e venafi.username)
This is also the place where we would handle any issues with those properties, e.g. a mandatory property is not set, or a property which doesn’t conform to some other validation.
Additionally you might actually need to create some resources that are necessary to decide what your task configuration should be e.g. some REST resource to check the status of a database.
    @Override
    public Class<? extends Task> taskClass() {
        return TppLogSourceTask.class;
    }
Source for method taskClass()
This is where you tell the Connect API what connector task should be linked to your Connector.
    @Override
    public List<Map<String, String>> taskConfigs(int maxTasks) {
        if (maxTasks != 1) {
            log.info("Ignoring maxTasks as there can only be one.");
        }
        List<Map<String, String>> configs = new ArrayList<>(maxTasks);
        Map<String, String> taskConfig = new HashMap<>();
        taskConfig.putAll(configProperties);
        configs.add(taskConfig);
        return configs;
    }
Source for method List<Map<String, String>> taskConfigs(int maxTasks)
Here is where you define how your tasks scale and what configuration each task should have. Recall that the source task deals with the specifics of how data is copied from the external system (Venafi in our case) to Kafka. Our connector only scales up to one task as the single REST endpoint doesn’t lend itself to dividing up the work into blocks. As such we return a list of a single configuration map. As an extra piece of information, each map in that list gets used to create and start a copy of your task class.
The tasks.max property defines how many tasks (or essentially workers) you want to provision for this connector across your cluster, but your task doesn’t have to scale up to that max.
N.B. Your connector and your tasks are not guaranteed to run on the same instance in your cluster, especially if you have multiple tasks and multiple instances in your cluster. As such, do not write code that relies on them being on the same JVM as you will soon run into problems.
Whilst our example only uses 1 task, the Confluent JDBC connector provides an example of scaling up your tasks.
In the above referenced code, you can see the minimum is taken as the value between the max tasks and the number of tables to work on. The reason for this is to handle the fact the tables are considered the smallest unit of work for the JDBC connector.
Then the tables are grouped into that number of groups. After that, each group is added to the return list with the necessary configuration for the task.
    @Override
    public void stop() {
    }
Source for method stop()
This is the last method that will get called either on shutdown of the Connect Service, or when a user decides they no longer want the connector running.
In our case we don’t have any resources to clean up, but this is where a cleanup should occur if required.
Source for class TppLogSourceTask.java
The SourceTask is where your code for deserialising the data from the external system and passing it into Kafka resides. The expected pattern is that the task takes responsibility for handling the connecting and basic passing of data to the Connect Service, after which any requirements in terms of filtering and transformation can then be applied as a separate activity.
When you extend the SourceTask class you bring along the SourceTaskContext. The SourceTaskContext gives you a hook into information that the broader Connect Service framework wants to expose. In our code we use the out of the box offsetStorageReader feature to get access to the information about where we were when we last started up. It also exposes the task configs which may have changed since the start function was called e.g. if a password for an external system has changed. If that is the case you may want to check this periodically, or on failure.
    @Override
    public void start(Map<String, String> props) {
        setupTaskConfig(props);

        log.debug("Trying to get persistedMap.");
        Map<String, Object> persistedMap = null;
        if (context != null && context.offsetStorageReader() != null) {
            persistedMap = context.offsetStorageReader().offset(Collections.singletonMap(URL, baseUrl));
        }
        log.info("The persistedMap is {}", persistedMap);
        if (persistedMap != null) {
            String lastRead = (String) persistedMap.get(LAST_READ);
            if (isNotNullOrBlank(lastRead)) {
                fromDate = lastRead;
            }

            Object lastApiOffset = persistedMap.get(LAST_API_OFFSET);
            if (lastApiOffset != null) {
                apiOffset = (Long) lastApiOffset;
            }
        }
    }
Source for method start(Map<String, String> props)
As with the Connector, your SourceTask also gets passed a map of your configuration and should initialise any resources and internal configuration needed based on it.
This method’s responsibility also includes ensuring the task is able to start up from the last processed point, in the event of a failure or restart. Kafka Connect provides a facility to track this information for you. In concept this is handled by attaching a reference offset to where you are in the source system with each record you pass to Kafka. Then on start, checking what the last processed record’s offset was and starting from that point.
In our case, as noted above, you can see this with the calls to the offset Storage Reader. We query with the reference to the partition the task is processing and then set our offsets of fromDate & apiOffset.
    @Override
    public List<SourceRecord> poll() {
        if (System.currentTimeMillis() > (last_execution + interval)) {
            last_execution = System.currentTimeMillis();
            String token = getToken();
            if (isNotNullOrBlank(token)) {
                return getTppLogsAsSourceRecords(token);
            }
        }
        return Collections.emptyList();
    }
Source for method poll()
This function is where all your actual “work” happens. Kafka will continually call it in loop as quickly as it has capacity for. It is in here that we should be making the calls to the external system and then returning a list of SourceRecords to the Connect framework. How our task specifically handled the implementation isn’t pertinent to understanding this section. What is important to note however, is that we converted the objects into SourceRecords and that we stored our offsets.
    private List<SourceRecord> getTppLogsAsSourceRecords(String token) {
        List<EventLog> jsonLogs = getTppLogs(token, fromDate, apiOffset);
        ArrayList<SourceRecord> records = new ArrayList<>();
        for (EventLog eventLog : jsonLogs) {


            String newFromDate = eventLog.getClientTimestamp().format(DateTimeFormatter.ISO_OFFSET_DATE_TIME);
            apiOffset = calculateApiOffset(apiOffset, newFromDate, fromDate);
            fromDate = newFromDate;


            log.debug(" The fromDate is now {}.", fromDate);
            records.add(buildSourceRecord(eventLog, fromDate, apiOffset));
        }
        return records;
    }
Source for method getTppLogsAsSourceRecords(String token)
As you can see from the code above, we set our internal offsets variables fromDate & apiOffset based on the new data we’re getting returned so that on the next poll, we’ll know where to pick up from. As we mentioned previously, we pass these offsets into the SourceRecords where Kafka saves them, and also into the offset storage so that if the task gets restarted due to failure, the offsetStorage will hold accurate information.
    private SourceRecord buildSourceRecord(EventLog eventLog, String lastRead, Long apiOffset) {
        Map<String, Object> sourceOffset = buildSourceOffset(lastRead, apiOffset);
        Map<String, Object> sourcePartition = buildSourcePartition();
        return new SourceRecord(sourcePartition, sourceOffset, topic, EventLog.TppLogSchema(), eventLog.toStruct());
    }
Source for method buildSourceRecord(EventLog eventLog, String lastRead, Long apiOffset)
Here you can see we create a sourceOffset Map which maps our text labels LAST_READ and LAST_API_OFFSET to the fromDate and apiOffset. This represents where we are in the source system for that record. In a more simple implementation you might only need a map of ID to some Identifier, indicating where you where in the source data e.g. a row number.
You can also see the sourcePartition being created as a singleton map linking URL to baseUrl. Again this represents the partition this task is working on e.g. a table or a file. Your source partition will be different depending on how your system processes data.
These source offset maps are then used to create a SourceRecord for a topic, additionally specifying a schema and the data object as a struct.
The topic is where this data will end up in the Kafka cluster. We’ll go into more detail on the schema and structs later on but essentially these tell Connect what format the data will be in, and allow you to transform/filter the data based on the described fields.
    @Override
    public void stop() {
    }
Source for method stop()
Again here is where we’d clean up any resources that we created during the lifetime of a task.
Structs are an abstraction provided by the Connect API of DTOs being sent to, or from, Kafka and are independent of whether they are serialized as JSON or AVRO, or provided as simple strings.
    public static final Schema SCHEMA = SchemaBuilder.struct()
            .name(EventLog.class.getSimpleName())
            .field(CLIENT_TIMESTAMP, Timestamp.SCHEMA)
            .field(GROUPING, Schema.INT32_SCHEMA)
            .field(ID, Schema.INT64_SCHEMA)
            .field(NAME, Schema.STRING_SCHEMA)
            .field(SERVER_TIMESTAMP, Timestamp.SCHEMA)
            .field(SEVERITY, Schema.STRING_SCHEMA)
            .field(SOURCE_IP, Schema.STRING_SCHEMA)
            .field(COMPONENT, Schema.OPTIONAL_STRING_SCHEMA)
            .field(COMPONENT_ID, Schema.OPTIONAL_INT32_SCHEMA)
            .field(COMPONENT_SUBSYSTEM, Schema.OPTIONAL_STRING_SCHEMA)
            .field(EVENT_ID, Schema.OPTIONAL_STRING_SCHEMA)
            .field(TEXT_1, Schema.OPTIONAL_STRING_SCHEMA)
            .field(TEXT_2, Schema.OPTIONAL_STRING_SCHEMA)
            .field(VALUE_1, Schema.OPTIONAL_INT32_SCHEMA)
            .field(VALUE_2, Schema.OPTIONAL_INT32_SCHEMA)
            .field(DATA, Schema.OPTIONAL_STRING_SCHEMA)
            .build();
Source for Schema
Here we can see the building of the Schema. At this point all we need to know is that it provides a named map, of field name to data type mappings. Other information such as whether it is simple or complex, required or optional can also be provided.
In our case we have a fairly flat object, but you can also pass in a schema for another complex object as the type allowing for deep & complex objects.
    public Struct toStruct() {
        Struct tppLog = new Struct(TppLogSchema())
                .put(CLIENT_TIMESTAMP, Date.from(getClientTimestamp().toInstant()))
                .put(GROUPING, getGrouping())
                .put(ID, getId())
                .put(NAME, getName())
                .put(SERVER_TIMESTAMP, Date.from(getServerTimestamp().toInstant()))
                .put(SEVERITY, getSeverity())
                .put(SOURCE_IP, getSourceIP());

        if (getComponent() != null) {
            tppLog.put(COMPONENT, getComponent());
        }
        if (getEventId() != null) {
            tppLog.put(EVENT_ID, getEventId());
        }
        if (getText1() != null) {
            tppLog.put(TEXT_1, getText1());
        }
        if (getText2() != null) {
            tppLog.put(TEXT_2, getText2());
        }
        if (getValue1() != null) {
            tppLog.put(VALUE_1, getValue1());
        }
        if (getValue2() != null) {
            tppLog.put(VALUE_2, getValue2());
        }
        if (getData() != null) {
            tppLog.put(DATA, getData());
        }
        if (getComponentId() != null) {
            tppLog.put(COMPONENT_ID, getComponentId());
        }
        if (getComponentSubsystem() != null) {
            tppLog.put(COMPONENT_SUBSYSTEM, getComponentSubsystem());
        }
        return tppLog;
    }
Source for method toStruct()
The code above shows the core struct being created using the Struct class, our Schema from before, and all of the fields that are marked required. We could simply pass that back as is, because the Schema does not require any other fields. As we may already have some additional info available, we set any optional fields we have in the Struct as well. Be aware, the Struct will throw an exception if a field doesn’t match it’s schema so checking this early on is crucial.
The ConfigDef exposes what configuration you require for your connector and hopefully how it manipulates your connector.
The Connect API provides an AbstractConfig that we extend, which provides some nice convenience classes for validation, defaulting and documentation.
    public static final ConfigDef CONFIG_DEF = new ConfigDef()
            .define(BASE_URL_CONFIG, ConfigDef.Type.STRING, ConfigDef.NO_DEFAULT_VALUE, new NonEmptyStringWithoutControlChars(), ConfigDef.Importance.HIGH, BASE_URL_DOC)
            .define(TOPIC_CONFIG, ConfigDef.Type.STRING, TOPIC_DEFAULT, new NonEmptyStringWithoutControlChars(), ConfigDef.Importance.HIGH, TOPIC_DOC)
            .define(BATCH_SIZE, ConfigDef.Type.INT, BATCH_SIZE_DEFAULT, ConfigDef.Range.between(MIN_BATCH_SIZE, MAX_BATCH_SIZE), ConfigDef.Importance.LOW, BATCH_SIZE_DOC)
            .define(POLL_INTERVAL, ConfigDef.Type.INT, POLL_INTERVAL_DEFAULT, ConfigDef.Importance.LOW, POLL_INTERVAL_DOC)
            .define(USERNAME_CONFIG, ConfigDef.Type.STRING, ConfigDef.Importance.HIGH, USERNAME_DOC)
            .define(PASSWORD_CONFIG, ConfigDef.Type.STRING, ConfigDef.Importance.HIGH, PASSWORD_DOC);
Source for ConfigDef
Our version of the configuration includes the field we’re looking for, its type, any validation, its importance and the documentation for the field – but the only thing you need to set is the field name.
If a validator is set, an exception will get thrown by the connector during the construction of the config if you have extended the AbstractConfig. This will fail the validator with a useful exception explaining how the field isn’t quite right or isn’t set. For info on this there are tests included that should help clarify things.
Before you can deploy your connector you need to package it in either as a “fat jar” or as a collection of jars, including your dependencies, except for direct Kafka dependencies.
            <plugin>
                <groupId>org.apache.maven.plugins</groupId>
                <artifactId>maven-shade-plugin</artifactId>
                <version>3.1.0</version>
                <executions>
                    <execution>
                        <phase>package</phase>
                        <goals>
                            <goal>shade</goal>
                        </goals>
                        <configuration>
                            <finalName>${project.artifactId}-${project.version}-fat</finalName>
                            <artifactSet>
                                <excludes>
                                    <exclude>classworlds:classworlds</exclude>
                                    <exclude>junit:junit</exclude>
                                    <exclude>jmock:*</exclude>
                                    <exclude>*:xml-apis</exclude>
                                    <exclude>org.apache.maven:lib:tests</exclude>
                                    <exclude>log4j:log4j:jar:</exclude>
                                    <exclude>io.confluent.*</exclude>
                                    <exclude>org.apache.kafka.connect.*</exclude>
                                    <exclude>org.apache.kafka:connect-api</exclude>
                                </excludes>
                            </artifactSet>
                        </configuration>
                    </execution>
                </executions>
            </plugin>
Source for Shade Plugin in pom.xml
In the above excerpt, we can see the maven-shade-plugin being set up to trigger on the package maven phase.
The final name is what the jar will get renamed to which you can modify or remove as there is a default value. The only thing in the configuration you really should keep are the excludes relating to confluent and connect as you should be pulling those jars from the deployed instance.
Apache provides more information on this plugin link here.
            <plugin>
                <artifactId>maven-assembly-plugin</artifactId>
                <version>3.0.0</version>
                <configuration>
                    <descriptors>
                        <descriptor>src/assembly/development.xml</descriptor>
                        <descriptor>src/assembly/package.xml</descriptor>
                    </descriptors>
                </configuration>
                <executions>
                    <execution>
                        <id>make-assembly</id>
                        <phase>package</phase>
                        <goals>
                            <goal>single</goal>
                        </goals>
                    </execution>
                </executions>
            </plugin>
Source for maven assembly plugin
The maven-assembly-plugin is slightly more involved but if you used the maven archetype a basic version of this should be set up for you already. You need only push most of the configuration relating to this to XML files under src/assembly and reference them and the plugin will use those files.
In our package.xml, you can see that we’ve added some fileSets relating to documentation and a basic property file from the config folder. We’ve as previously excluded the Confluent and Kafka connect jars.
For more information on the plugin go here.
The easiest way to deploy the connector is to use the fat jars from earlier but you can use the assembly plugin as well.
Before we get to deploying your connector, I need to give a little context about how you pass in your configuration to Connect when starting up your connector.
# The first few settings are required for all connectors: a name, the connector class to run, and the maximum number of tasks to create:
name=venafi
connector.class=com.opencredo.connect.venafi.tpp.log.TppLogSourceConnector
tasks.max=1
# The remaining configs are specific to the Venafi source connector. In this example, we connect to
# the VENAFI VEDSDK API on localhost using username "admin" and password "admin". These values should be changed for
# your specific instance.
venafi.base.url=https://localhost:443/VEDSDK
venafi.username=admin
venafi.password=admin

# Topic to publish VENAFI log data to.
# The default is "VENAFI-LOGS".
# Valid Values: non-empty string and no ISO control characters
#venafi.topic=VENAFI-LOGS

# Window of data to pull from log api.
# Valid Values: [2,...,10000]
# The default is 100.
#venafi.batch.size=100

# Poll interval in milliseconds. E.G. Roughly, how often the connector will connect to the VENAFI VEDSDK API.
# The default is 1000 as in once a second.
#venafi.poll.interval=1000
Source for source-quickstart.properties
The mandatory parts here are name, connector.class and tasks.max.
The name is what you’ll reference your connector by when starting up the connector. The connector.class is the full class path reference for your connector. This helps Connect link the name to which specific connector to start up. The tasks.max property is used when the connector starts up and defines the maximum number of tasks that should be started though, again, it’s technically up to you on how you handle that in the code. Whilst this property file is being used to setup your connector we would suggest you use something like Puppet or Ansible to generate them and to obfuscate the password while being backed by version control.
Beyond that any other connector properties should be placed here that you want to use when starting up the connector.
Deploying a connector is as simple as following these 5 steps:
<path-to-confluent>/share/java/kafka-connect-<your-plugin><path-to-confluent>/bin/confluent load <your-plugin-name> -d <path/to><your-property-file>.propertiesFor more information please look at the Confluent instructions on manually installing connectors.
After you’ve created your first connector you might decide others may also want to connect to that same technology. The best place to put your connector is the Confluent Hub.
A rather useful Maven plugin I mostly found by accident is Confluent’s kafka-connect-maven-plugin.
            <plugin>
                <groupId>io.confluent</groupId>
                <artifactId>kafka-connect-maven-plugin</artifactId>
                <version>0.11.1</version>
                <executions>
                    <execution>
                        <goals>
                            <goal>kafka-connect</goal>
                        </goals>
                        <configuration>
                            <title>Kafka Connect Venafi</title>
                            <documentationUrl>
                                https://github.com/opencredo/kafka-connect-venafi/blob/master/README.md
                            </documentationUrl>
                            <description>
                                This connector connects via HTTP to your instance of the Venafi Platform and pulls
                                your Log events into Kafka, allowing you to do any filtering/transforming/processing
                                you'd like to do within a comfortable Kafka environment.

                                N.B. Currently the connector starts from the beginning of time (i.e. processes all past
                                events first), a future release will allow the option of starting from now (i.e.
                                skipping all previous events).
                            </description>
                            <logo>logos/venafi.png</logo>
                            <supportProviderName>${connect.component.owner.username}</supportProviderName>
                            <supportSummary>OpenCredo supports the Venafi source connector on behalf of Venafi.
                            </supportSummary>
                            <supportUrl>https://github.com/opencredo/kafka-connect-venafi</supportUrl>
                            <supportLogo>logos/opencredo.png</supportLogo>
                            <ownerUsername>opencredo</ownerUsername>
                            <ownerType>organization</ownerType>
                            <ownerName>${connect.component.owner.username}</ownerName>
                            <ownerUrl>https://opencredo.com/</ownerUrl>
                            <ownerLogo>logos/opencredo.png</ownerLogo>
                            <componentTypes>
                                <componentType>source</componentType>
                            </componentTypes>
                            <tags>
                                <tag>venafi</tag>
                            </tags>
                            <confluentControlCenterIntegration>true</confluentControlCenterIntegration>
                        </configuration>
                    </execution>
                </executions>
            </plugin>
Source for kafka-connect-maven-plugin
Now here you can see most of the properties we needed to set to use the plugin effectively, but be aware we also needed to set our SCM element at the top as well as a handful of maven properties relating to connect and package. These were connect.component.owner.username, connect.component.componentTypes, project.package.home and project.build.sourceEncoding.
The main bulk of these settings are bringing together your jar for others’ use and setting what things are displayed on the confluent Hub website. These include information about you or your company, whom to talk to for support, and even what search tags should link to your connector and what type of connector you provide.
For more information you can refer to Confluent plugin info.
Hopefully this was helpful in bringing you up to speed on how we wrote our connector and how you can write your own.
Here are some useful links for further reading/watching.
This blog is written exclusively by the OpenCredo team. We do not accept external contributions.
SHARE


Platform Engineering Day Europe 2024 – Maturing Your Platform Engineering Initiative (Recording)
Watch the recording of our CEO/CTO, Nicki Watt from the KubeCon + CloudNativeCon 2024 on her talk “To K8S and Beyond – Maturing Your Platform…
GOTO Copenhagen 2023 – The 12 Factor App For Data (Recording)
Watch the recording of our Technical Delivery Director, James Bowkett from the GOTO Copenhagen 2023 conference for his talk ‘The 12 Factor App For Data’
The 2023 Mayor’s Business Climate Challenge (BCC) – Final Part
Learn more about our efforts and our progress towards becoming an environmentally friendly company for the Mayor’s Business Climate Challenge (BCC) in 2023 in this…