January 24, 2017 | Cloud
This blog aims to provide an end to end example of how you can automatically request, generate and install a free HTTPS/TLS/SSL certificate from Let’s Encrypt using Terraform. Let’s Encrypt is a free, automated, and open certificate authority (CA) aiming to make it super easy (and free – did I say free!) for people to obtain HTTPS (SSL/TLS) certificates for their websites and infrastructure. Under the hood, Let’s Encrypt implements and leverages an emerging protocol called ACME to make all this magic happen, and it is this ACME protocol that powers the Terraform provider we will be using. For more information on how Let’s Encrypt and the ACME protocol actually work, please see how Let’s Encrypt works.

At present, Terraform does not have a native ACME provider as part of its core offering, although this has been requested. In the meanwhile, a standalone provider (https://github.com/paybyphone/terraform-provider-acme) has already sprung up which provides us with a great first pass at exploring what a terraform ACME integration may look like. Getting certain aspects of the ACME protocol and Terraform to play nicely together can be somewhat challenging as discussed here and here, plus the ACME spec itself is still in draft and evolving. I expect this standalone provider will more than likely be merged into the core Terraform codebase at some point. However I also think it will undergo a few (potentially fundamental) changes along the way. So in short, you have been warned – things may change, this is not set in stone! Nevertheless, let’s crack on and see how far we can get with what we currently have and know!
To practically demonstrate how this all works, we will spin up a basic Amazon Web Services (AWS) environment with an example website needing an HTTPS certificate. This basic environment will comprise of a VPC housing two EC2 instances with NGINX installed on them. These instances will be fronted by a classic Elastic Load Balancer (ELB) terminating HTTPS. In other words, it is against the classic ELB that our freshly generated certificate from Let’s Encrypt will need to be uploaded.
Let’s Encrypt can only issue certificates against publicly accessible domain names. This requires the use of a real domain name, and the ability to demonstrate control over that domain. For this blog, our example website will be made available under the domain letsencrypt-terraform.ocdemo.net and we will also use AWS’s Route53 as our API driven DNS provider.
Note: By the time you actually read this, the letsencrypt-terraform.ocdemo.net domain, as well as any infrastructure backing it, will no longer exist. If you therefore want to run this example for yourself, you will first need to get your own domain name, and make the appropriate changes to the Terraform configuration.
If you want to follow along and actually run the Terraform example in GitHub as-is, there are a few prerequisites you will need.
ocdemo.net domain.Download the core Terraform as well as the standalone ACME Terraform provider binaries and ensure they are available on your path. Example instructions are based on a MacOS environment, using Terraform v0.8.4 and ACME Terraform provider v0.2.1.
mkdir ~/demobin
wget https://releases.hashicorp.com/terraform/0.8.4/terraform_0.8.4_darwin_amd64.zip
unzip terraform_0.8.4_darwin_amd64.zip -d ~/demobin
wget https://github.com/paybyphone/terraform-provider-acme/releases/download/v0.2.1/terraform-provider-acme_v0.2.1_darwin_amd64.zip
unzip terraform-provider-acme_v0.2.1_darwin_amd64.zip -d ~/demobin
sudo chmod +x demobin/terraform*
export PATH=$PATH:~/demobin
Clone the GitHub repo https://github.com/opencredo/letsencrypt-terraform.git, change into the consolidated demo directory where we will run Terraform from.
git clone https://github.com/opencredo/letsencrypt-terraform.git
cd demos/acme-consolidated
Configure the domain name details, and target Let’s Encrypt server to use. Let’s Encrypt advise on using their staging server first to ensure you get things right, and to prevent hitting production rate limits until you are genuinely ready. When you are happy, this can be changed to use the production server. The staging server works in pretty much the same way as the production server. It will however generate certificates signed by the Let’s Encrypt Test CA which will NOT automatically be trusted by the browser. Not necessarily a problem for our first test run, but we will want to use the production server for our final setup. https://gist.github.com/nickithewatt/d8d3e93ea003c9b2af053c5880d2e012
Using environment variables, configure your AWS credentials as required by the core Terraform provider. See this link for more information about AWS access keys, and how to create them if need be. The entity behind these access credentials will need to be given permissions (via IAM) to create and destroy all the AWS infrastructure components used in this blog include EC2 instances, VPC’s, ELBs etc.
export AWS_ACCESS_KEY_ID=yyyyyyyy
export AWS_SECRET_ACCESS_KEY=zzzzzzzz
export AWS_DEFAULT_REGION=eu-west-1
demos/acme-consolidated/variables.tf file configure an email address to use for registration with Let’s Encrypt .variable "demo_acme_registration_email" { default="your-email@your-domain.com" }
Let’s Encrypt (The ACME provider) has separate processes for registering an account, and then managing certificates via it. An email address and public/private keypair is used to create a new account. In this blog, we will be doing both the initial account registration, and the subsequent certificate request as part of a single consolidated process. A keypair used for the account registration will be generated for you on the fly, the only piece of information you need to supply upfront is an email address. This email is used to notify you when certificates expire, and other account activities. Behind the scenes it checks to ensure an appropriate email (MX) record exists against the domain.
TF_VAR_ environment variables as shown below. These will be used by the ACME Terraform provider to create Route53 records as part of its response to the Let’s Encrypt DNS challenge. .# These can simply be the same as those specified for the core # AWS terraform credentials export TF_VAR_demo_acme_challenge_aws_access_key_id=$AWS_ACCESS_KEY_ID export TF_VAR_demo_acme_challenge_aws_secret_access_key=$AWS_SECRET_ACCESS_KEY export TF_VAR_demo_acme_challenge_aws_region=$AWS_DEFAULT_REGION
In addition to the basic account creation detailed above, our Terraform ACME implementation is configured to respond to a DNS challenge (dns-01) as the mechanism for demonstrating control over the domain. This will involve the Terraform ACME provider creating some temporary DNS records against the domain to prove to Let’s Encrypt that we really have control over the domain. Under the covers the Terraform ACME provider delegates this responsibility to an underlying library called lego. lego is a Let’s Encrypt client and ACME library written in Go. As we are using Route53 as our DNS provider, lego will need some AWS credentials to manipulate the appropriate Route53 resources. By default a Terraform ACME provider configured to respond to a Route53 DNS challenge will look for, and pass through environment variables with the names AWS_ACCESS_KEY_ID and AWS_SECRET_ACCESS_KEY to lego. These just happen to coincide with those used by Terraform but it is not guaranteed this will remain that way.
To avoid confusion, and provide more flexibility should you want to use different credentials for this aspect of the process, we define some variables which are required to be explicitly defined and passed in.
We should now be in a place where we can actually run Terraform. You should first do a Terraform plan in order to verify that your basic setup and configuration is correct. Then, provided all is well do a Terraform apply and all the infrastructure will be stood up, certificates and all!
terraform get
terraform plan
terraform apply
Once Terraform completes, and assuming that the DNS entries have propagated (I found that sometimes the AWS ELB DNS name was taking up to a minute to propagate out), you should now be able to go and visit your domain, served securely over HTTPS. You should see the default NGINX page, with a slight modified title to indicate whether it is hitting EC2 instance 1 or 2.
When running with the Let’s Encrypt staging server configured, your browser (Chrome used for example) will look something like that shown below. Recall that the staging server creates certificates signed by the Let’s Encrypt test CA, which is not automatically trusted by browsers. It is still however very useful for testing!
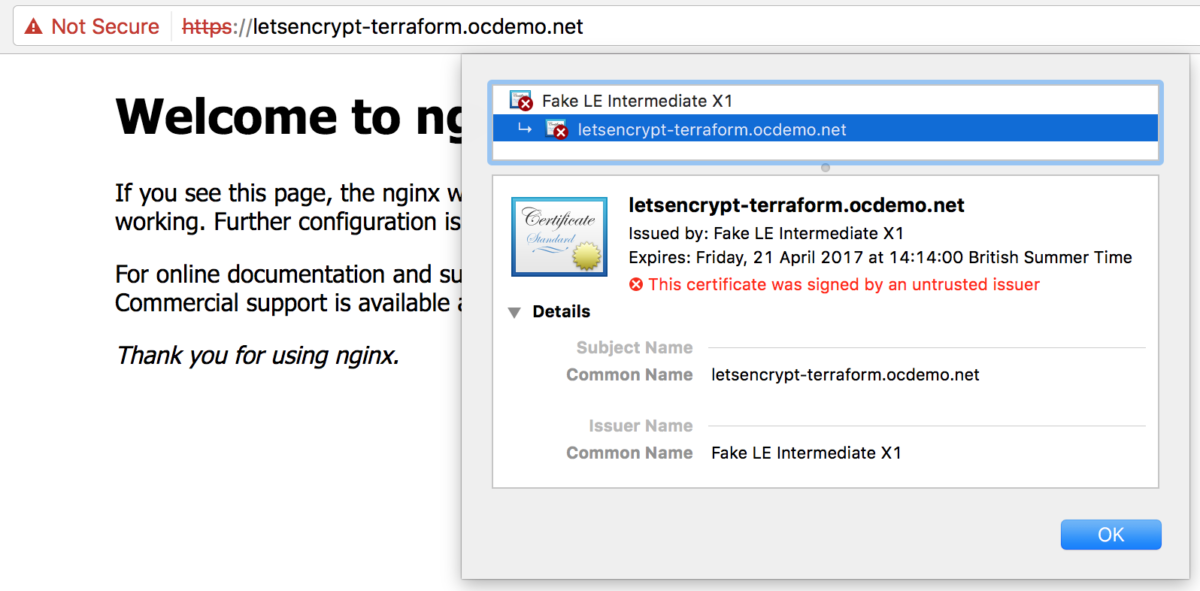 Domain with a Let’s Encrypt staging signed certificate
When changed to use the Let’s Encrypt production server however, your site should be loaded with a perfectly formed, validated and trusted HTTPS certificate.
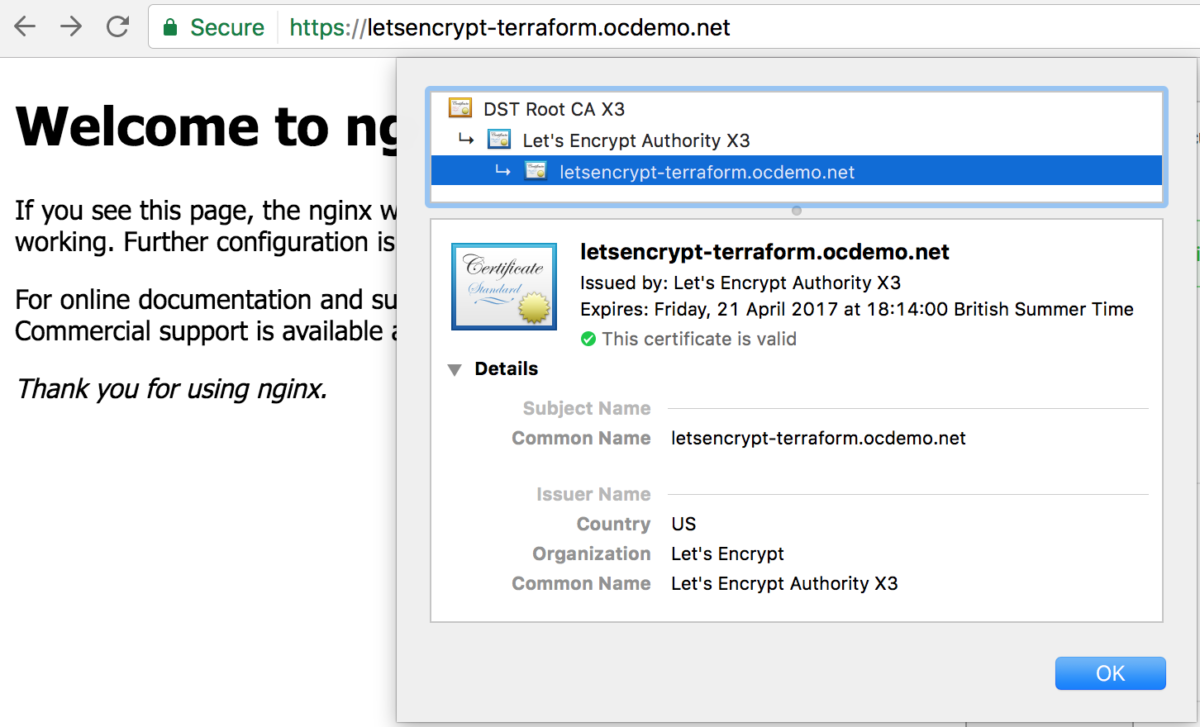 Domain with a Let’s Encrypt production signed certificate
Running this domain through the online Qualys SSL Server Test utility results in an A rating! All of this done with one Terraform invocation, and all for free – did I say free!
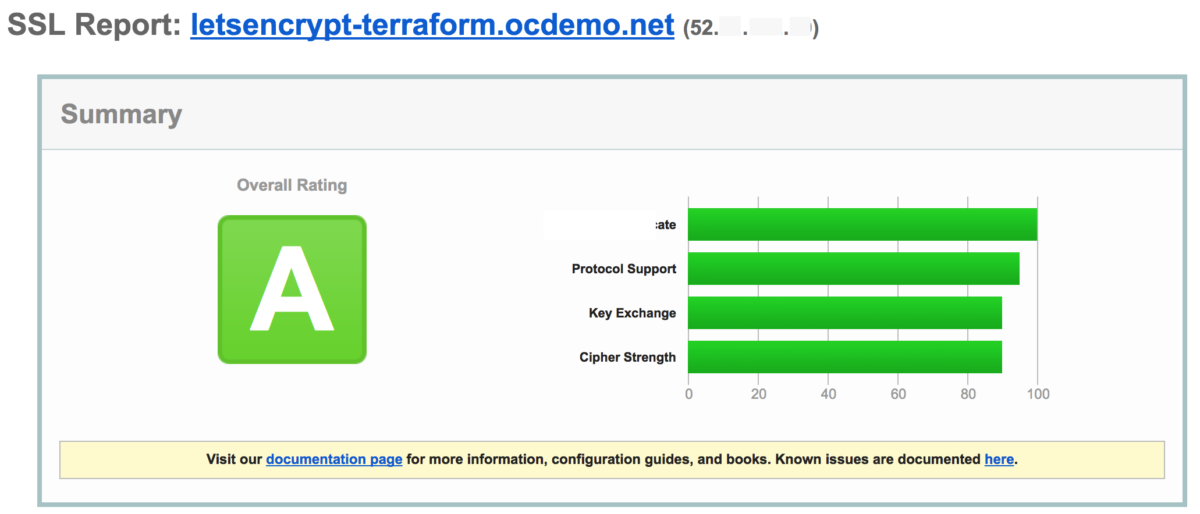 Qualys SSL Server Test results
Let’s start by looking at a diagram depicting the logical Terraform process flow taking place.
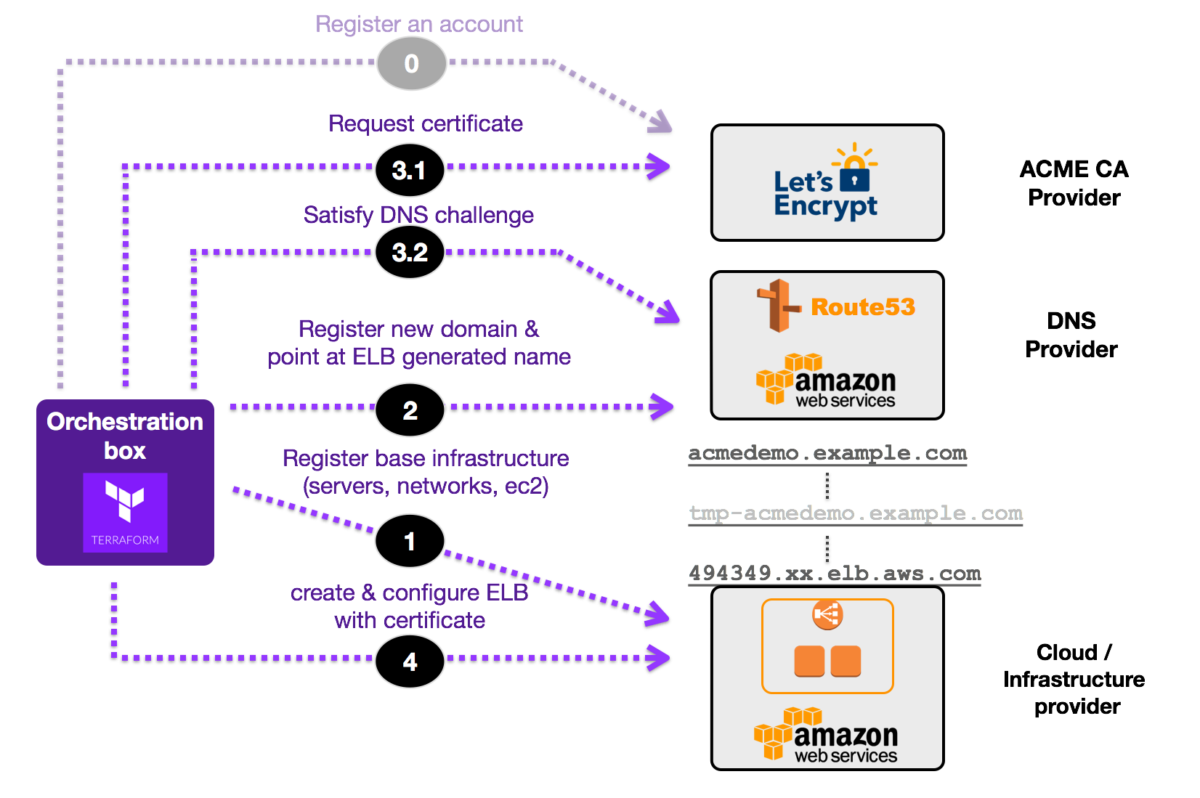 Logical overview of Terraform integration flow
The above is a logical flow. In reality, the integrations happen in a bit more of a parallel fashion. For the purposes of trying to explain the core concepts though, it has been simplified to the above.
The Terraform definition files have been broken up into distinct modules, with each Terraform module responsible for assembling a logical unit of the overall environment.
The main Terraform file used to kick the whole process off is shown below. We shall dip into appropriate aspects of each of the modules as we go along as well.
The Let’s Encrypt account registration step should really only be done once. This step is the equivalent of registering for an account with a CA, or AWS. This demo is however trying to show a simple all-in-one approach. As such, this step is simply incorporated as part of the overall process. The terraform configuration to do this is shown below.
Please see the demos/acme-part-1-registration and demos/acme-part-2-core directories if you would like to see an example of how this Terraform process could be split.
Within the aws-demo-env module, all of the VPC’s, subnets and EC2 instances will be setup. Although the ELB is also defined in this module, it has a dependency on the certificate to be created by Let’s Encrypt. As this will not have occurred yet, it will simply block and wait. Our EC2 instances need NGINX installed and started on them. To keep things simple, we simply do an inline installation by using the Terraform remote-exec provisioner. Below is the fragment showing the EC2 instance configuration. If you would like to see the VPC config and other networking related config please see the full code in GitHub.
At this point we need to actually create and register our new domain letsencrypt-terraform.ocdemo.net. Unfortunately this is where things don’t quite work as simply as we would like. Ideally we would just create a single CNAME record pointing directly to the AWS ELB name. Note however in this config we create two. The primary DNS record letsencrypt-terraform.ocdemo.net points at an, as yet potentially uncreated interim DNS entry tmp-letsencrypt-terraform.ocdemo.net. This interim record, once it is created, points at the final AWS ELB DNS name.
Within Route53, when the whole process is complete, this results in the following DNS entries:

The code in the dns/indirect module is used to get around the scenario where a cyclic dependency would otherwise be introduced. This cyclic dependency would be established between the ELB resource, the primary DNS record and the certificate request process if a single record were used. Changing the demos/acme-consolidated/main.tf file to use the dns/direct module, without any other changes, results in the following error when trying to do a Terraform apply:
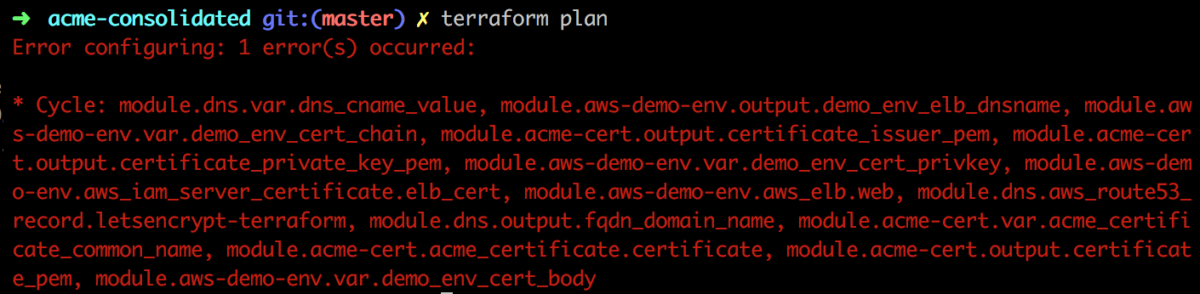 Terraform plan cyclic dependency when using dns/direct module without other changes
Granted this two record, indirect approach is ugly. You can get away with only having one record (see changes which would need to be made below). Doing so however introduces the possibility of a race condition whereby you will you will no longer be guaranteed that the primary DNS record is created before your certificate request goes through. So for this demo, to try and ensure the basic principle can be demonstrated I am opting for the ugly, but more predictable approach. It is however something to be aware of.
If you do want to opt of the single DNS record approach, the core change required is to decouple the direct sharing of the ${module.dns.fqdn_domain_name} output variable from the dns module, into the acme-cert module. This will then allow for the use of the direct version of the dns module, which only has one primary CNAME record.
This is really the heart of the matter where the standalone Terraform ACME provider kicks in. Recall that the ACME provider uses lego under the covers. The native lego library makes the call to Let’s Encrypt to request the certificate as expected. Satisfying the DNS challenge requires the creation of temporary TXT records in Route53. This is also done by ACME Terraform provider, and not by the core Terraform AWS provider as one might expect. This can sometimes be confusing if you are starting out.
As these TXT are only temporarily created before being deleted, you will not see them listed with your other main entries created in the Route53 console. Within AWS, the only way to know that they were ever created would be to turn on CloudTrail, Amazon’s service for recording and tracking AWS API calls made in your account. Specifically you would need to ensure you configure CloudTrail to log Route53 API calls.
If you do turn CloudTrail on you will see a chronological order of all the DNS records created. This includes the TXT as well as CNAME records. This info is extracted in a nicer report format and shown below. This nicely depicts our cyclic dependency workaround in progress as well!
1) UPSERT CNAME - "Managed by Terraform"
 "letsencrypt-terraform.ocdemo.net" -> "tmp-letsencrypt-terraform.ocdemo.net"
2) UPSERT TXT - "Managed by Lego"
 "_acme-challenge.letsencrypt-terraform.ocdemo.net." -> "Zsd6v68ShPeKKlgw...e_dH5K-M"
3) DELETE TXT - "Managed by Lego"
 "_acme-challenge.letsencrypt-terraform.ocdemo.net."
4) UPSERT CNAME - "Managed by Terraform"
 "tmp-letsencrypt-terraform.ocdemo.net" -> "letfdemo-elb-www-123456.eu-west-1.elb.amazonaws.com"
With the certificate challenge successfully complete and the generation finished, the ELB creation can now also complete. The certificate is uploaded as an IAM Server certificate and the attached to the ELB.
The above examples demonstrate an end-to-end process for creating infrastructure and generating a Let’s Encrypt certificate all in one go using Terraform – nice! There are however a few downsides and gotchas to this note with this current setup and approach.
The standalone ACME Terraform provider is a great start for seeing how this integration could work. Some of the process is still clunky however, and it will probably need to still go through a few more changes before it can better be integrated into a fully automated, and granular end-to-end system. That said, it serves as a good start for trying to push for getting HTTPS everywhere, including in Terraform driven infrastructure. The standalone ACME Terraform provider repo also has more details on applying other challenges and various other configuration options which may be useful. It is worth keeping an eye on to see how it evolves.
I will probably write another follow up blog once it has settled down a little bit more. For now, I hope this blog has helped to try and demonstrate how these two great technologies can work together! If you have any comments, please do let me know!
Note: The focus of this blog is on demonstrating the Let’s Encrypt Terraform integration. Time has not been expended crafting a production ready VPC with appropriate subnets split across availability zones etc. It should also be noted that AWS now has an Application Load Balancer (ALB), which may well be a better fit depending on the use case. Configuring these options are left as an exercise for the user if desired.
This blog is written exclusively by the OpenCredo team. We do not accept external contributions.
SHARE


Cloud for Business in 2023: Raconteur and techUK webinar (Recording)
Check out the recording of our CEO/CTO Nicki Watt, and other panellists at the Raconteur and techUK webinar discussing “The Cloud for Business Report,” which…
Lunch & Learn: Secure Pipelines Enforcing policies using OPA
Watch our Lunch & Learn by Hieu Doan and Alberto Faedda as they share how engineers and security teams can secure their software development processes…