February 14, 2018 | Cloud
AWS Announced a few new products for use with containers at RE:Invent 2017 and of particular interest to me was a new Elastic Container Service(ECS) Launch type, called Fargate
Prior to Fargate, when it came to creating a continuous delivery pipeline in AWS, the use of containers through ECS in its standard form, was the closest you could get to an always up, hands off, managed style of setup. Traditionally ECS has allowed you to create a configured pool of “worker” instances, with it then acting as a scheduler, provisioning containers on those instances.

Fargate takes this one step further, allowing you to run tasks and services on infrastructure fully managed by AWS so that you no longer have to manage your own EC2 instances, instead relying entirely on a serverless, Container As A Service platform.
This essentially provides us with a Serverless option for running containers – no EC2 instances for operations teams to worry about, meaning no patching, no AMI baking, etc. This has the potential to dramatically reduce the barrier to entry for containerisation and further reduce any customer’s requirement to look outside of the Amazon ecosystem. This all AWS, all severless setup should reduce costs as well – you’re no longer paying for any resource that you’re not actively using. This is slightly different to Lambda, where you actually pay nothing unless someone is making requests to your application, here you only pay for the resources allocated to your container.
This in depth post looks to show you what all the steps are required to do this, as well as looking to gain insight into the inevitable follow on question “is this a good idea?”
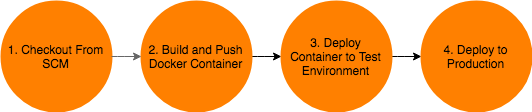
With that in mind, I set out to deploy a very simple “Hello World” type application utilising Fargate, as part of entirely Amazon based product suite.
I’m going to use CodeCommit, CodeBuild, the Elastic Container Registry, the Elastic Container Service and CodePipeline to glue these services together.
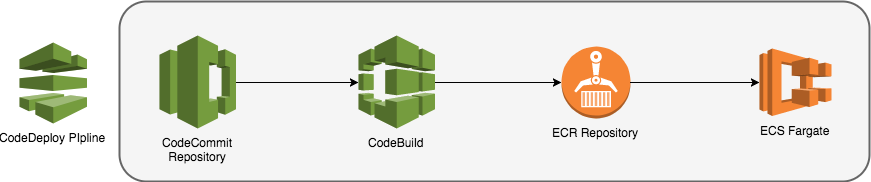
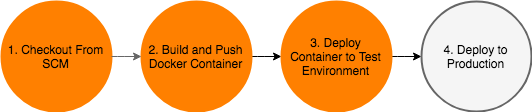
Below is a visualisation of the steps I want my deployment pipeline to be able to cover.
All the source code and Cloudformation templates used in this article is available in a git repository. Each step in the post has an associated branch, that has the relevant code snippets discussed in the post committed to it.
For the purposes of this post, I’ve already set up an AWS account, and configured my command line client. All the examples shown below are run directly from my laptop.
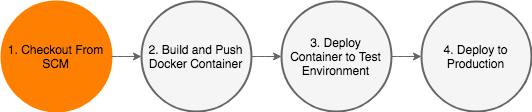
I first need to create a repository to store the code for my application. AWS has CodeCommit for this, and the setup is simple enough:
$ # Create a new repository in codecommit
$ aws codecommit create-repository --repository-name fargate-welcomer
$ # Add my public key to my IAM User, so I can use SSH access to the git repo
$ aws iam upload-ssh-public-key --user-name miles.wilson --ssh-public-key-body "$(< ~/.ssh/id_rsa.pub)"
After running the create-repository command, the CLI spits back a clone url for me where I can use my standard git client to checkout and start working with my code:
$ git clone ssh://git-codecommit.us-east-1.amazonaws.com/v1/repos/fargate-welcomer
Cloning into 'fargate-welcomer'...
warning: You appear to have cloned an empty repository.
I’m ready to start writing an application!
I’ve created a very simple Python app, that’s in the repository I set up to accompany this blog post. In order to get the code from this external repository into my newly created AWS CodeCommit repo, I will add it as a remote to the repository I just cloned from CodeCommit.
$ git remote add github git@github.com:opencredo/fargate-welcomer.git
$ git pull github --all
$ git push origin --all
The application I’ve created is very simple – it just returns “Hello World!” when the root endpoint is called. It will be enough for me to prove the pipeline through though. I can check that the app works as expected by building and running the Docker container locally on my laptop:
$ docker build -t fargate-welcomer .
Sending build context to Docker daemon 126.5kB
...
Successfully built e88ac0e5849f
Successfully tagged fargate-welcomer:latest
$ Docker run -d --rm -p 5000:5000 fargate-welcomer
fde25c449406b6833e5f8541954a4c50f41c1e0b84a28d93dfd8aed9624b7298
$ curl localhost:5000
Hello World!
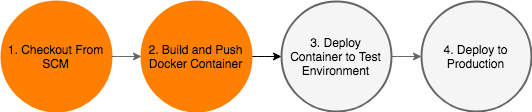
If I want AWS to build my Docker image for me, I’ll need to set up an ECR Repository, CodeBuild, and CodePipeline.
CodePipeline allows you to stitch together a deployment pipeline, and provides a UI as well as a number of prebuilt “Actions” you can assemble together in “Stages”. One of these actions is to call CodeBuild, which is analogous to TravisCI – it can execute scripts inside containers for you, the purpose being to compile and test applications.
Whilst I might normally turn to Terraform at this point to create these three resources within my AWS account, I’m trying to use only AWS products, so I’ll use CloudFormation. I’m going to walk through each resource in my initial CloudFormation template (cf/build-pipeline.yml in the repo), one at a time.
To start with, I will create an Elastic Container Registry Repository to hold our container images. This will be my central repository, and be used by all clusters to pull Docker images from.
Resources:
  Repository:
    Type: AWS::ECR::Repository
    DeletionPolicy: Retain
Then I need an IAM Role that has the relevant permissions to build the container: this means allowing the CodeBuild service access to the ECR Registry, as well as the ability to clone the CodeCommit git repo, and ship logs to CloudWatch.
CodeBuildServiceRole:
   Type: AWS::IAM::Role
   Properties:
       Path: /
       AssumeRolePolicyDocument: |
       {
           "Statement": [{
               "Effect": "Allow",
               "Principal": { "Service": [ "codebuild.amazonaws.com" ]},
               "Action": [ "sts:AssumeRole" ]
           }]
       }
       Policies:
           - PolicyName: root
           PolicyDocument:
               Version: 2012-10-17
               Statement:
               - Resource: arn:aws:codecommit:us-east-1:639943058375:fargate-welcomer
                   Effect: Allow
                   Action:
                   - codecommit:GitPull
               - Resource: "*"
                   Effect: Allow
                   Action:
                   - logs:CreateLogGroup
                   - logs:CreateLogStream
                   - logs:PutLogEvents
                   - ecr:GetAuthorizationToken
               - Resource: !Sub arn:aws:ecr:${AWS::Region}:${AWS::AccountId}:repository/${Repository}
                   Effect: Allow
                   Action:
                   - ecr:GetDownloadUrlForLayer
                   - ecr:BatchGetImage
                   - ecr:BatchCheckLayerAvailability
                   - ecr:PutImage
                   - ecr:InitiateLayerUpload
                   - ecr:UploadLayerPart
                   - ecr:CompleteLayerUpload
CodePipeline needs an S3 bucket to store artifacts between build stages, so I add one to the template:
PipelineStorageBucket:
   Type: "AWS::S3::Bucket"
   Properties:
     AccessControl: Private
Now I can define a CodeBuild project. This is going to check out the source from CodeCommit, build the Docker container, and push it to ECR. I’m passing the ECR Repository name to the build process as an environment variable, so it knows where to push the container image once it’s been built.
CodeBuildProject:
    Type: AWS::CodeBuild::Project
    Properties:
      Artifacts:
        Type: "CODEPIPELINE"
      Source:
        Type: "CODEPIPELINE"
      Environment:
        ComputeType: "BUILD_GENERAL1_SMALL"
        Image: "aws/codebuild/Docker:1.12.1"
        Type: "LINUX_CONTAINER"
        EnvironmentVariables:
          - Name: REPOSITORY_URI
            Value: !Sub ${AWS::AccountId}.dkr.ecr.${AWS::Region}.amazonaws.com/${Repository}
      Name: !Ref AWS::StackName
      ServiceRole: !Ref CodeBuildServiceRole
CodeBuild expects to find a file called buildspec.yml in the root directory of the source artifact (our CodeCommit repo). This file describes the build and test process you would like CodeBuild to execute. The one used in my case is very simple – it just executes Docker build, and pushes to the repository provided in the environment variable.
version: 0.2
phases:
  build:
    commands:
      - Docker build -t ${REPOSITORY_URI}:${CODEBUILD_RESOLVED_SOURCE_VERSION} .
  post_build:
    commands:
      - $(aws ecr get-login)
      - Docker push ${REPOSITORY_URI}:${CODEBUILD_RESOLVED_SOURCE_VERSION}
${CODEBUILD_RESOLVED_SOURCE_VERSION} is an environment variable that CodeBuild injects into every build process, that contains the git checksum used for the build. I’m tagging the container with the git checksum, so it is possible to identify which version of an application is running in the various environments.
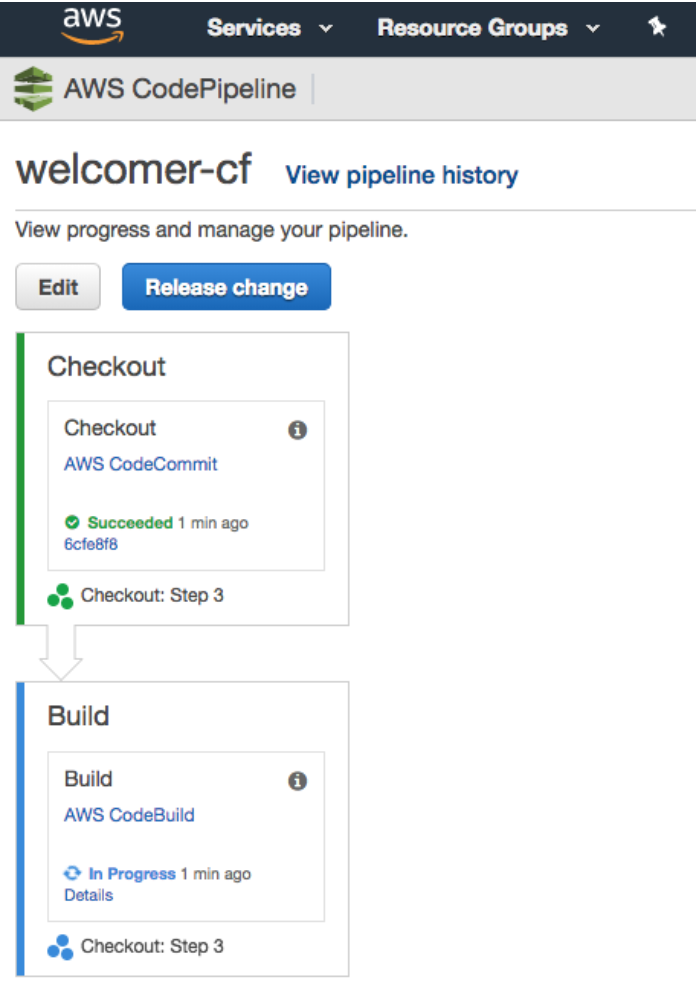
Now the CodePipeline can be defined. To Start with, this will just checkout the code from CodeCommit (the Checkout stage) and then ask CodeBuild to build and push our Docker container (the Build stage). The S3 bucket is used to pass the cloned repository to CodeBuild.
BuildPipeline:
   Type: "AWS::CodePipeline::Pipeline"
   Properties:
     ArtifactStore:
       Type: "S3"
       Location: !Ref PipelineStorageBucket
     Name: welcomer-cf
     RoleArn: !Sub arn:aws:iam::${AWS::AccountId}:role/AWS-CodePipeline-Service
     Stages:
       - Name: Checkout
         Actions:
         - Name: Checkout
           ActionTypeId:
             Category: Source
             Owner: AWS
             Provider: CodeCommit
             Version: 1
           RunOrder: 1
           Configuration:
               BranchName: step-3
               PollForSourceChanges: false
               RepositoryName: fargate-welcomer
           OutputArtifacts:
             - Name: MyApp
       - Name: Build
         Actions:
         - Name: Build
           ActionTypeId:
             Category: Build
             Owner: AWS
             Provider: CodeBuild
             Version: 1
           RunOrder: 1
           Configuration:
               ProjectName: !Ref CodeBuildProject
           OutputArtifacts:
             - Name: MyAppBuild
           InputArtifacts:
             - Name: MyApp
In order to have the pipeline executed on every commit to the master branch, I need to use CloudWatch Events. In order for CloudWatch to be able to be able to trigger the pipeline, I need to create an IAM Role for it to assume:
 CodeCommitTriggerRole:
   Type: AWS::IAM::Role
   Properties:
     Path: /
     AssumeRolePolicyDocument: |
       {
           "Statement": [{
               "Effect": "Allow",
               "Principal": { "Service": [ "events.amazonaws.com" ]},
               "Action": [ "sts:AssumeRole" ]
           }]
       }
     Policies:
       - PolicyName: AllowTriggeringOfPipelineFromCommit
         PolicyDocument:
           Version: 2012-10-17
           Statement:
             - Resource: !Sub arn:aws:codepipeline:${AWS::Region}:${AWS::AccountId}:${BuildPipeline}
               Effect: Allow
               Action:
                 - codepipeline:StartPipelineExecution
Once the permissions are in place, the event needs to trigger the pipeline:
PipelineNotification:
   Type: "AWS::Events::Rule"
   Properties:
     Description: Notify CodeBuild of new commits
     EventPattern:
       source:
        - aws.codecommit
       detail-type:
        - CodeCommit Repository State Change
       resources:
         -  !Sub arn:aws:codecommit:us-east-1:${AWS::AccountId}:fargate-welcomer
       detail:
         referenceType:
           - branch
         referenceName:
           - master
     Name: WelcomerCodeCommitRule
     Targets:
     - Arn: !Sub arn:aws:codepipeline:${AWS::Region}:${AWS::AccountId}:${BuildPipeline}
       Id: WelcomerBuildPipeline
       RoleArn: !GetAtt CodeCommitTriggerRole.Arn
I’ve placed the build pipeline in the cf folder of the application repository. Lets create the stack from the command line, which in turn will create the pipeline.
$ aws cloudformation create-stack --stack-name welcomer-cf --template-body file://cf/build-pipeline.yml --capabilities CAPABILITY_IAM
{
    "StackId": "arn:aws:cloudformation:us-east-1:xxxxx:stack/welcomer-cf/ea482d80-efb4-11e7-xxxx-xxxxxxxxxx"
}
At this point, I can create a new commit, push to CodeCommit, and see the app build in the console:
$ echo 'v0.0.1' > version.txt
$ git commit -a -m "Add a version"
$ git push origin
Now I have an an application that gets built, and pushed into a Docker registry.
A Docker container is not much use unless it’s running somewhere – so I will create another template that defines the “Environment” – this template can be used to stand up multiple Fargate compatible ECS Clusters in our pipeline. (Test, and Production in this simplified)
To make this post a little simpler, I’ve already set up a VPC, with public subnets and required routing tables. If you need to set this up – the reference template from aws labs will be useful.
I’m going to export some of the outputs from this template, which means I can retrieve information from deployed stacks based on this template when I deploy my service. This allows me to run multiple stacks based on this template for different environments.
---
Description: "This template creates an ECS Cluster, Load Balancer and Required Security Groups"
Outputs:
 Listener:
   Description: "A reference to a port 80 listener"
   Value: LoadBalancerListener
   Export:
     Name: !Sub "${EnvironmentName}-LoadBalancerListener"
 LoadBalancer:
   Description: "A reference to the Application Load Balancer"
   Value: !Ref LoadBalancer
   Export:
     Name: !Sub "${EnvironmentName}-LoadBalancer"
 LoadBalancerUrl:
   Description: "The URL of the ALB"
   Value: !GetAtt LoadBalancer.DNSName
   Export:
     Name: !Sub "${EnvironmentName}-LoadBalancerUrl"
 ServiceSecurityGroup:
   Description: Security Group That Services should use
   Value: !Ref ServiceSecurityGroup
   Export:
     Name: !Sub "${EnvironmentName}-ServiceSecurityGroup"
 VPC:
   Description: "The ID of the Environment VPC"
   Value: !Ref VPC
   Export:
     Name: !Sub "${EnvironmentName}-VPCID"
 ClusterName:
   Description: "The Cluster Reference for the Created ECS Cluster"
   Value: !Ref ECSCluster
   Export:
     Name: !Sub "${EnvironmentName}-ClusterName"

Parameters:
 EnvironmentName:
   Description: "An environment name that will be prefixed to resource names"
   Type: String
 PublicSubnetOne:
   Description: "Choose which subnets the Application Load Balancer should be deployed to"
   Type: "AWS::EC2::Subnet::Id"
 PublicSubnetTwo:
   Description: "Choose which subnets the Application Load Balancer should be deployed to"
   Type: "AWS::EC2::Subnet::Id"
 VPC:
   Description: "Choose which VPC the Application Load Balancer should be deployed to"
   Type: "AWS::EC2::VPC::Id"

Resources:
 ECSCluster:
   Type: "AWS::ECS::Cluster"
   Properties:
     ClusterName: !Sub ${EnvironmentName}-cluster

 DefaultTargetGroup:
   Properties:
     Name: !Sub "${EnvironmentName}-default"
     Port: 80
     Protocol: HTTP
     VpcId: !Sub ${VPC}
   Type: "AWS::ElasticLoadBalancingV2::TargetGroup"
 LoadBalancer:
   Properties:
     Name: !Ref EnvironmentName
     SecurityGroups:
       - !Ref LoadBalancerSecurityGroup
     Subnets:
       - !Sub ${PublicSubnetOne}
       - !Sub ${PublicSubnetTwo}
     Tags:
       -
         Key: Name
         Value: !Ref EnvironmentName
   Type: "AWS::ElasticLoadBalancingV2::LoadBalancer"
 LoadBalancerListener:
   Properties:
     DefaultActions:
       -
         TargetGroupArn: !Ref DefaultTargetGroup
         Type: forward
     LoadBalancerArn: !Ref LoadBalancer
     Port: 80
     Protocol: HTTP
   Type: "AWS::ElasticLoadBalancingV2::Listener"
 LoadBalancerSecurityGroup:
   Type: "AWS::EC2::SecurityGroup"
   Properties:
     GroupDescription: "Access to the load balancer that sits in front of ECS"
     SecurityGroupIngress:
       -
         CidrIp: 0.0.0.0/0
         IpProtocol: -1
     Tags:
       -
         Key: Name
         Value: !Sub "${EnvironmentName}-LoadBalancers"
     VpcId: !Sub ${VPC}
 ServiceSecurityGroup:
   Type: "AWS::EC2::SecurityGroup"
   Properties:
     GroupDescription: "Access to the load balancer that sits in front of ECS"
     SecurityGroupIngress:
       - SourceSecurityGroupId: !Ref LoadBalancerSecurityGroup
         IpProtocol: -1
     Tags:
       -
         Key: Name
         Value: !Sub "${EnvironmentName}-LoadBalancers"
     VpcId: !Sub ${VPC}
Although this template is included in the repository created for this blog post, this is for ease of use only. It would normally be kept in an independant repository, as it is not associated with the application.
Using the template defined above, I will create a cluster called “test” via the command line:
aws cloudformation create-stack --stack-name test-cluster \
--template-body file://cf/ecs-cluster.yml --capabilities CAPABILITY_IAM \
--parameters \
    ParameterKey=EnvironmentName,ParameterValue=test \
    ParameterKey=PublicSubnetOne,ParameterValue=subnet-694f310c \
    ParameterKey=PublicSubnetTwo,ParameterValue=subnet-f2c785df \
    ParameterKey=VPC,ParameterValue=vpc-70a53016
I now have two separate cloudformation templates:
cf/builder.yml – which contains the definition of the pipeline.
cf/ecs-cluster.yml – which contains the definition of an ECS cluster (Environment).
I now need to create a template to deploy our service into ECS. This template (cf/service.yml) describes everything required to launch the container based application on a given ECS Cluster.
Parameters:
  Tag:
    Description: Docker image tag to Deploy
    Type: String
  Repository:
    Description: Name of ECR Repository that holds the Docker image.
    Type: String
  EnvironmentName:
    Description: Name of environment to deploy application in
    Type: String
  Path:
    Description: The path to register with the Application Load Balancer
    Type: String
    Default: /welcomer
The template is parameterised to allow me to pass in the ECR repository name, an image tag I wish to deploy, and the environment I would like to deploy the service to.
I want to view logs from all instances of this service together in CloudWatch Logs, so I need a log group to aggregate logs from my containers once they’re deployed.
Resources:
 MicroserviceLogGroup:
   Type: "AWS::Logs::LogGroup"
   Properties:
     LogGroupName: !Sub /ecs/${EnvironmentName}/${Repository}
     RetentionInDays: 7
Containers in ECS have their own “Task Execution Role”, much like an EC2 Instance Role. I need one that can push logs to the log group I created, pull the Docker image, and register the service with a load balancer.
TaskExecutionServiceRole:
   Type: AWS::IAM::Role
   Properties:
     Path: /
     AssumeRolePolicyDocument: |
       {
           "Statement": [{
               "Effect": "Allow",
               "Principal": { "Service": [ "ecs-tasks.amazonaws.com" ]},
               "Action": [ "sts:AssumeRole" ]
           }]
       }
     Policies:
       - PolicyName: root
         PolicyDocument:
           Version: 2012-10-17
           Statement:
             - Resource: "*"
               Effect: Allow
               Action:
                 - logs:CreateLogGroup
                 - logs:CreateLogStream
                 - logs:PutLogEvents
                 - ecr:GetAuthorizationToken
             - Resource: !Sub arn:aws:ecr:${AWS::Region}:${AWS::AccountId}:repository/${Repository}
               Effect: Allow
               Action:
                 - ecr:GetDownloadUrlForLayer
                 - ecr:BatchGetImage
                 - ecr:BatchCheckLayerAvailability
             - Resource: "*"
               Effect: Allow
               Action:
                 - ec2:AuthorizeSecurityGroupIngress
                 - ec2:Describe*
                 - elasticloadbalancing:DeregisterInstancesFromLoadBalancer
                 - elasticloadbalancing:Describe*
                 - elasticloadbalancing:RegisterInstancesWithLoadBalancer
                 - elasticloadbalancing:DeregisterTargets
                 - elasticloadbalancing:DescribeTargetGroups
                 - elasticloadbalancing:DescribeTargetHealth
                 - elasticloadbalancing:RegisterTargets
Each Service in ECS can have multiple tasks associated with it. (If you are familiar with Kubernetes, tasks are equivalent to a Kubernetes “Pod” in that they group one or more containers together as a single item). The task I wish to run only has one container in it, and I’ve allocated 512mb of ram, and 256 CPU shares. The NetworkMode “awsvpc” means that my container gets an Elastic Network Interface associated with it, rather than using Docker’s bridge, or host modes which would normally be used to map a virtual interface on the container, to a “physical” interface on the host. Fargate requires the use of the “awsvpc” mode, as there is no host available to make use of the other modes.
MicroserviceTaskDefinition:
   Type: AWS::ECS::TaskDefinition
   Properties:
       RequiresCompatibilities: ["FARGATE"]
       NetworkMode: "awsvpc"
       Cpu: '256'
       Memory: '512'
       ExecutionRoleArn: !Ref TaskExecutionServiceRole
       ContainerDefinitions:
       -   Name: welcomer-service
           Cpu: '256'
           Essential: 'true'
           Image: !Sub ${AWS::AccountId}.dkr.ecr.${AWS::Region}.amazonaws.com/${Repository}:${Tag}
           Memory: '512'
           PortMappings:
           - HostPort: 5000
             ContainerPort: 5000
           LogConfiguration:
             LogDriver: "awslogs"
             Options:
               awslogs-group: !Sub /ecs/${EnvironmentName}/${Repository}
               awslogs-region: !Sub ${AWS::Region}
               awslogs-stream-prefix: ecs
       Volumes: []
I then link assign the task to the service, note that I set the LaunchType to “FARGATE” – this means AWS will run the tasks on the serverless Fargate platform, not on ECS EC2 instances – it is possible to run hybrid clusters, with some workloads deployed to EC2 instances, and others to Fargate.
Fargate requires that your containers are executed inside a VPC, so I pass through my exported parameters from my cluster definition in step 4:
ServiceDefinition:
   Type: "AWS::ECS::Service"
   Properties:
     Cluster:
       Fn::ImportValue:
         !Sub "${EnvironmentName}-ClusterName"
     LaunchType: FARGATE
     DesiredCount: 1
     LoadBalancers:
       - ContainerName: "welcomer-service"
         ContainerPort: 5000
         TargetGroupArn: !Ref TargetGroup
     NetworkConfiguration:
       AwsvpcConfiguration:
         AssignPublicIp: ENABLED
         SecurityGroups:
           - Fn::ImportValue:
               !Sub "${EnvironmentName}-ServiceSecurityGroup"
         Subnets:
           - Fn::ImportValue:
               !Sub "${EnvironmentName}-ServiceSubnetOne"
           - Fn::ImportValue:
               !Sub "${EnvironmentName}-ServiceSubnetTwo"
     ServiceName: welcomer-service
     TaskDefinition: !Ref MicroserviceTaskDefinition
I can also get the service to register itself against a load balancer once the stack is launched, the TargetGroup defines my healthcheck, and port that I wish to be exposed on the ALB, the ListenerRule picks up requests sent to /welcomer and forwards them to the TargetGroup.
TargetGroup:
   Type: AWS::ElasticLoadBalancingV2::TargetGroup
   Properties:
       VpcId:
         Fn::ImportValue:
           !Sub "${EnvironmentName}-VPCID"
       Port: 80
       Protocol: HTTP
       Matcher:
           HttpCode: 200-299
       TargetType: ip
       HealthCheckIntervalSeconds: 10
       HealthCheckPath: !Sub ${Path}/hello
       HealthCheckProtocol: HTTP
       HealthCheckTimeoutSeconds: 5
       HealthyThresholdCount: 2


 ListenerRule:
   Type: AWS::ElasticLoadBalancingV2::ListenerRule
   Properties:
       ListenerArn:
         Fn::ImportValue:
           !Sub "${EnvironmentName}-LoadBalancerListener"
       Priority: 2
       Conditions:
           - Field: path-pattern
             Values:
               - !Sub ${Path}/*
       Actions:
           - TargetGroupArn: !Ref TargetGroup
             Type: forward
I can test out this template from the command line:
$ aws cloudformation update-stack --stack-name welcomer-test-deploy \
--template-body file://cf/service.yml \
--capabilities CAPABILITY_IAM --parameters \
ParameterKey=Repository,ParameterValue=welco-repos-1tggtw4f3ih1h \
ParameterKey=Tag,ParameterValue=6b06612f8a32ffc7250e80288a8b26fb0f862d07 \
ParameterKey=EnvironmentName,ParameterValue=test

$ curl http://test-2122677686.us-east-1.elb.amazonaws.com/welcomer/hello
Hello World!
However, I want this to be continuously delivered – so there are a few changes I need to make.
Firstly, I need to capture the latest built version of the container from the CodeBuild process, this is easily achieved by adding the following line to my buildspec.yml:
...
      - Docker push ${REPOSITORY_URI}:${CODEBUILD_RESOLVED_SOURCE_VERSION}
      - echo "{\"Parameters\":{\"Tag\":\"${CODEBUILD_RESOLVED_SOURCE_VERSION}\"}}" > overrides.json
artifacts:
  files:
    - overrides.json
This captures the git commit reference in a way that I can use later on as a parameter to my service CloudFormation template.
To my codepipeline definition I now add an additional stage:
- Name: Test
  Actions:
  - Name: Deploy
    ActionTypeId:
      Category: Deploy
      Owner: AWS
      Provider: CloudFormation
      Version: 1
    RunOrder: 1
    Configuration:
      ActionMode: CREATE_UPDATE
      Capabilities: CAPABILITY_IAM
      ParameterOverrides: !Sub  '{ "Repository":  "${Repository}", "EnvironmentName": "test"}'
      RoleArn: !Sub arn:aws:iam::${AWS::AccountId}:role/CloudFormerAdmin
      StackName: !Sub "${Repository}-test"
      TemplateConfiguration: MyAppBuild::overrides.json
      TemplatePath: MyApp::cf/service.yml
    InputArtifacts:
      - Name: MyAppBuild
      - Name: MyApp
This stage will run my cf/service.yml cloudformation template from the application’s CodeCommit repository. By setting the ActionMode to CREATE_UPDATE, if the app has never been deployed before a new stack will be created automatically, else it will update an existing stack. The update is performed without downtime automatically, and in the event that the new version of the service does not become healthy, the deployment will be rolled back automatically as well.
In a more formalised setup, I would want a number of test phases to be included in this pipeline, but for the purposes of exploring a “Serverless” Continuous Delivery pipeline, I’m going to assume that if the healthcheck passes in test, it’s okay to deploy that version to production.
In order to do this, I need a production cluster, which I will again start via the command line:
$ aws cloudformation create-stack --stack-name prod-cluster \
--template-body file://cf/ecs-cluster.yml --capabilities CAPABILITY_IAM \
--parameters \
ParameterKey=EnvironmentName,ParameterValue=prod \
ParameterKey=PublicSubnetOne,ParameterValue=subnet-694f310c \
ParameterKey=PublicSubnetTwo,ParameterValue=subnet-f2c785df \
ParameterKey=VPC,ParameterValue=vpc-70a53016
I will also need a new stage at the end of my pipeline:
- Name: Production
  Actions:
  - Name: Deploy
    ActionTypeId:
      Category: Deploy
      Owner: AWS
      Provider: CloudFormation
      Version: 1
    RunOrder: 1
    Configuration:
      ActionMode: CREATE_UPDATE
      Capabilities: CAPABILITY_IAM
      ParameterOverrides: !Sub  '{ "Repository":  "${Repository}", "EnvironmentName": "prod"}'
      RoleArn: !Sub arn:aws:iam::${AWS::AccountId}:role/CloudFormerAdmin
      StackName: !Sub "${Repository}-prod"
      TemplateConfiguration: MyAppBuild::overrides.json
      TemplatePath: MyApp::cf/service.yml
    InputArtifacts:
      - Name: MyAppBuild
      - Name: MyApp
I can update the pipeline from the command line easily:
$ aws cloudformation update-stack --stack-name welcomer-cf --template-body file://cf/build-pipeline.yml --capabilities CAPABILITY_IAM
A subsequent push to my CodeCommit repository results in codepipeline going all the way through to production, with zero downtime, and zero servers that need to be maintained. I’m paying only for the containers in use, traffic, and for the build time required by CodeBuild.
With regards to the “Is this a good idea?” question, the answer as always is about tradeoffs. To actually productionize this pipeline, a large amount more work would need to be done: tests, failure scenarios, notifications etc, would all need to be defined and implemented. However, it’s encouraging to know that it is at least possible to deliver an application without running a server, indeed without stepping outside of Amazon at all.
In a future post, I’d like to explore using tooling from outside the AWS ecosystem, to try and find a more comfortable solution – in places the AWS offering doesn’t feel particularly coherent, and the AWS console can be bewildering to those that at the end of the day, want to know why their build failed, or find a copy of a test report.
Below is a summary of my experience, expressed as a list of pros and cons, for what it is like to use an entirely AWS stack to deploy a containerized workload.
In terms of the original goal I set out to achieve, I have shown that it it is possible to create a “serverless continuous delivery” pipeline capable of building and deploying an application without running a single server, indeed without stepping outside of Amazon at all.
A significant part of my all AWS setup was the use of Fargate. This provided me with the ability to push my built containers into a stable, production like environment, without having to worry about any of the underlying machines needed to run these containers.
Fargate itself is thus extremely powerful, especially when coupled with cloudformation templates. Having said that, whilst AWS excels at the “runtime” part of building and running software, the development tooling and processes feels a bit more immature, in comparison to the more established SAAS vendors.
Whilst the goal to demonstrate an all AWS setup was achieved, given a completely free hand, my approach to such a challenge would generally involve a bit more of a pragmatic mixed approach. Using other tooling (e.g. Terraform) and SaaS offerings (such as GitHub, TravisCI etc) to make this a more streamlined, and developer friendly experience. So entirely AWS Serverless CD is indeed an option, albeit subject to a few of the challenges noted!
This blog is written exclusively by the OpenCredo team. We do not accept external contributions.
SHARE


Cloud for Business in 2023: Raconteur and techUK webinar (Recording)
Check out the recording of our CEO/CTO Nicki Watt, and other panellists at the Raconteur and techUK webinar discussing “The Cloud for Business Report,” which…
Lunch & Learn: Secure Pipelines Enforcing policies using OPA
Watch our Lunch & Learn by Hieu Doan and Alberto Faedda as they share how engineers and security teams can secure their software development processes…