February 20, 2019 | DevOps, Hashicorp, Kafka, Open Source
Creating and managing a Public Key Infrastructure (PKI) could be a very straightforward task if you use appropriate tools. In this blog post, I’ll cover the steps to easily set up a PKI with Vault from HashiCorp, and use it to secure a Kafka Cluster.

If you have ever tried to secure a service with TLS and Public Key Infrastructure (PKI), you will know how hard it can be. Common tasks include issuing client and server certificates to trusted parties, managing certification renewal, distributing Certificate Authority (CA) trust chains and publishing certificate revocation lists (CRLs). All these tasks require expertise and tools to make a PKI manageable and effective. But even if you have all of these, due to the inherent complexity of the PKI, many people still shy away from it.
In this blog post, I’ll cover the steps to easily set up a PKI with Vault from HashiCorp, and use it to secure a Kafka Cluster. Vault is a security tool which provides secrets management, identity-based access and encryption to systems and users. Kafka is a distributed fault-tolerant, high-throughput and low-latency streaming platform for handling real-time data feeds.
This will be a step-by-step guide, one which allows you to simply copy and paste the commands and have a working solution at the end. The solution could be then re-applied to many other services in your infrastructure. This post doesn’t require any previous knowledge of Kafka, however a basic understanding of Vault and its use of tokens, and PKI, in general, will be highly beneficial.
The diagram below depicts the target architecture and the setup we want to work with. At a high level, we want a standard, secure Kafka cluster, which additionally ensures that only valid clients can send and receive data and instructions to it.
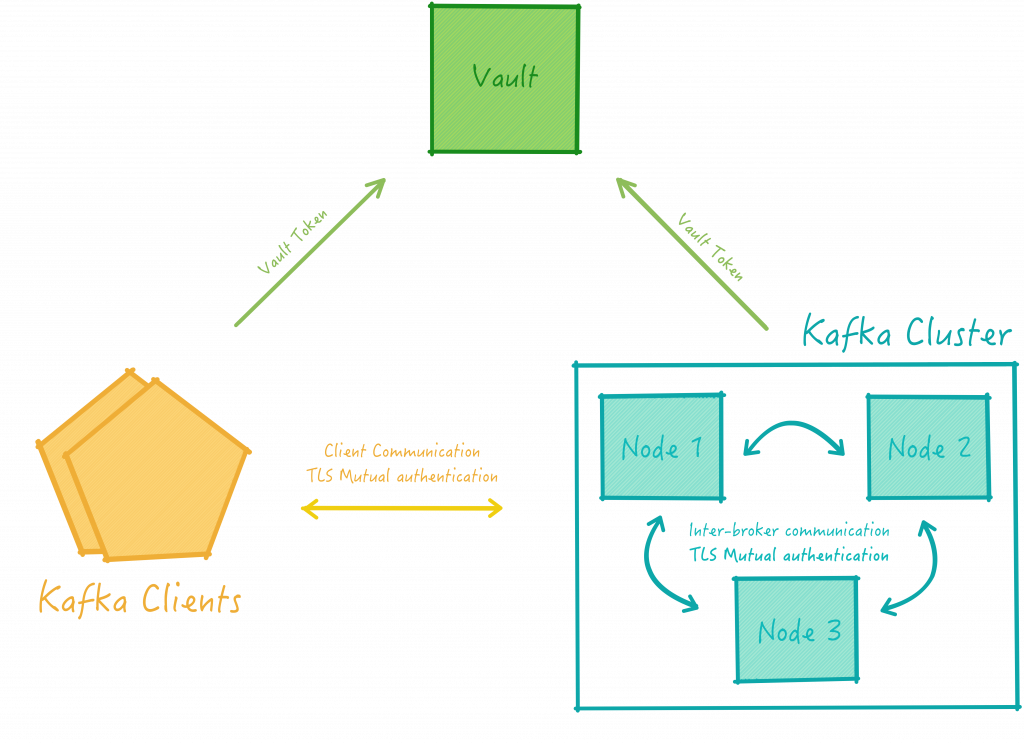
More specifically, from a PKI perspective, this solution will include the following components:
PKI is all built around trust hierarchies and our solution will be no different. We will need to define what our PKI trust hierarchy should look like so that we can configure the various components appropriately.
A traditional PKI has a Root CA at the top of the trust chain. However, it’s a good practice to not issue certificates directly from the Root CA, but instead, issue from a Subordinate CAs (Intermediary CAs) for a few reasons:
In order to follow the best practices, we will use the following hierarchy:
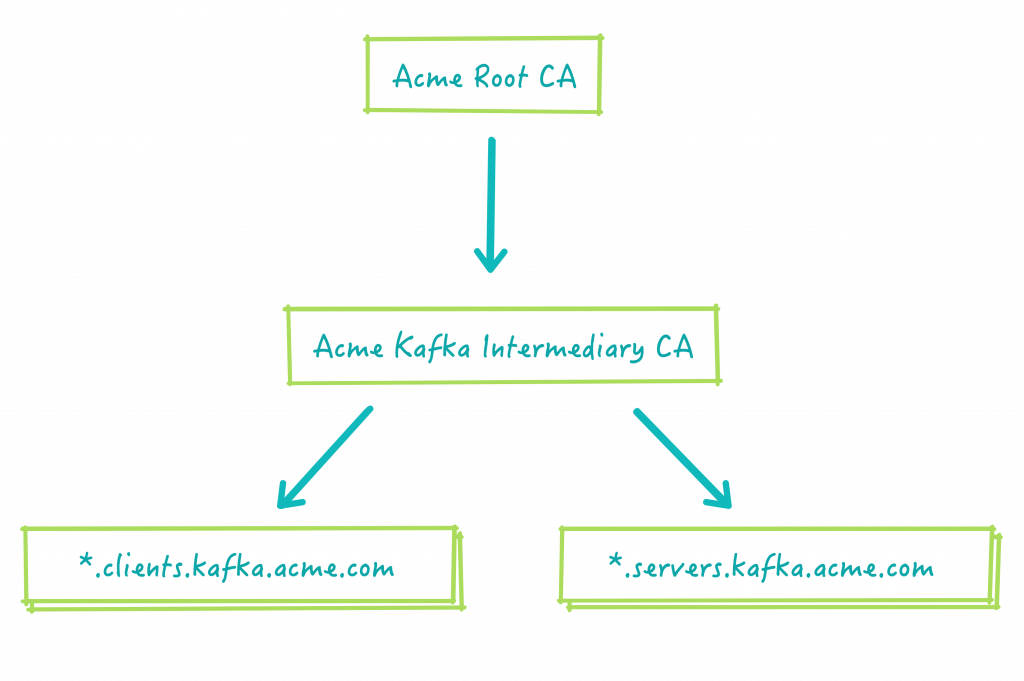
Where:
.servers.kafka.acme.com and .clients.kafka.acme.com are common name suffixes (or domains) like we would see in normal websites. We will ensure clients and servers have different domains because this allows us to distinguish the communication between a client and a server, from the inter-broker or server to server communication (as depicted in the next diagram).
This separation provides us with better security controls when setting up ACLs and also when granting permissions in Vault as we will shortly see.
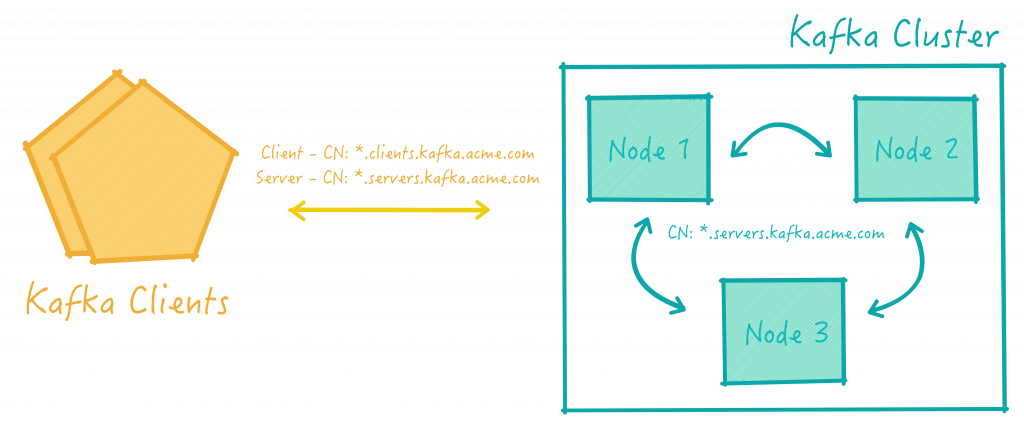
In our solution, we would like to have servers that can request servers certificates and clients that can request client certificates. Vault uses the concept of roles to ensure that only appropriate actions are able to be requested and enacted upon by authenticated users. Therefore, in order to avoid a client from requesting a server certificate, we will configure two separate roles in Vault:
Servers will then be assigned Vault tokens with kafka-server role and clients, with kafka-clients, thereby restricting them to operate within these limits.
The method of assigning tokens is not covered here as they can vary a lot depending on your infrastructure capabilities. Vault, however, supports many authentication mechanisms. In this post, we will just use Vault tokens created from a root token, however in a production setup, more care would be taken here.
In terms of trust relationships, we will configure Kafka nodes to trust certificates issued by the Acme Kafka Intermediary CA. This way, clients or servers with certificates issued by this authority will be able to authenticate against the cluster. On the client-side, we will configure the Kafka Clients to trust servers holding certificates issued by the same certification authority.
In this section, we will start configuring Vault and Kafka to work together following our previously described design.
The first steps will be about configuring the Root CA, the Intermediary CA and the required roles in Vault.
We will then move on to Kafka and configure the key and trust stores to enable TLS communication between parties and configure the Kafka ACLs to authorise different parties to perform different operations.
Once Vault and Kafka are properly set up, we will configure the Kafka CLI tools to produce and consume messages using TLS security to validate the solution.
Just before we start make sure you have all the prerequisites listed below installed.
For the instructions in this post, you will need:
To install Vault and Kafka, simply decompress the archives into an empty directory.
It will be handy to include the Vault binary into your PATH environment variable like:
export PATH=(yourfolder):$PATH
The very first step is to start our Vault server. For simplicity, we will use Vault in development mode so that we don’t need to worry about unsealing the Vault Cluster and securing the Vault API itself.
To start Vault, just enter:
vault server -dev
Vault should be running now. In development mode, the CLI uses the Vault Root Token to authenticate against the Vault server (When starting, the Vault server writes the root token to ~/.vault-token which the CLI picks up). So we only need to open another terminal and type:
export VAULT_ADDR='http://127.0.0.1:8200'
And to verify that you can connect to Vault correctly, simply type:
vault secrets list
If the authentication is working correctly, you should see a table with paths and descriptions. So far, so good.
Let’s now start configuring our PKI.
First, we have to enable and initialise the Vault PKI secret engine with:
vault secrets enable -path root-ca pki
vault secrets tune -max-lease-ttl=8760h root-ca
This will create the path root-ca in Vault.
Now, we create our Root CA certificate and private key and save the certificate into the file root-ca.pem:
vault write -field certificate root-ca/root/generate/internal \
    common_name="Acme Root CA" \
    ttl=8760h > root-ca.pem
Notice that the Root CA key is not exposed. It will be stored internally in Vault. The root-ca.pem file contains only the root CA certificate and not its private key.
We also should configure our Certificate Revocation List URL:
vault write root-ca/config/urls \
    issuing_certificates="$VAULT_ADDR/v1/root-ca/ca" \
    crl_distribution_points="$VAULT_ADDR/v1/root-ca/crl"
It’s time for the Intermediary CA. It’s possible to have another Vault server for the intermediary, but for simplicity, we will use the same Vault server. The Intermediary CA configuration is very similar to the Root CA one. We configure another Vault PKI secret engine, but now, on path kafka-int-ca:
vault secrets enable -path kafka-int-ca pki
vault secrets tune -max-lease-ttl=8760h kafka-int-ca
To form the PKI hierarchy, we now need to have our Intermediary CA certificate signed by the Root CA. In order to do that, we need to create a certificate signing request:
vault write -field=csr kafka-int-ca/intermediate/generate/internal \
    common_name="Acme Kafka Intermediate CA" ttl=43800h > kafka-int-ca.csr
And ask the Root CA to sign our request and issue our final certificate:
vault write -field=certificate root-ca/root/sign-intermediate csr=@kafka-int-ca.csr \
    format=pem_bundle ttl=43800h > kafka-int-ca.pem
We then upload it to our Intermediary CA:
vault write kafka-int-ca/intermediate/set-signed certificate=@kafka-int-ca.pem
Similarly, we configure the CRL for the intermediary:
vault write kafka-int-ca/config/urls issuing_certificates="$VAULT_ADDR/v1/kafka-int-ca/ca" \
    crl_distribution_points="$VAULT_ADDR/v1/kafka-int-ca/crl"
At this point, Vault is configured with our PKI. However, we also want to restrict which users can issue which certificates. As we said previously, we will use roles for that. More specifically, PKI roles.
For Kafka clients, we create the kafka-client PKI role:
vault write kafka-int-ca/roles/kafka-client \
    allowed_domains=clients.kafka.acme.com \
    allow_subdomains=true max_ttl=72h
Likewise, we create kafka-server PKI role for Kafka nodes:
vault write kafka-int-ca/roles/kafka-server \
    allowed_domains=servers.kafka.acme.com \
    allow_subdomains=true max_ttl=72h
Ok, roles in Vault can be a bit confusing sometimes. In the previous step, we created the PKI role. This is essentially a role in the PKI secret engine, but it’s not directly related to a role that a user can assume.
In order to allow users to use that PKI role, we need to configure roles in our authentication mechanism – in our case the Token authentication.
Essentially, our token needs a role (and an attached policy) that will allow the token holder (the user) to assume a certain PKI role in the PKI secret engine.
Simple, right? 🙂
First, we need to create a policy that will be associated with each role. For the client role, this is:
cat > kafka-client.hcl <<EOF
path "kafka-int-ca/issue/kafka-client" {
  capabilities = ["update"]
}
EOF
This policy states that whatever token using this policy can assume the kafka-client PKI role.
We then write the policy to Vault:
vault policy write kafka-client kafka-client.hcl
The next steps are about configuring the Token authentication to assign the correct policy to all tokens that are created with kafka-client role:
vault write auth/token/roles/kafka-client \
    allowed_policies=kafka-client period=24h
And then, we repeat similar steps for the server role.
cat > kafka-server.hcl <<EOF
path "kafka-int-ca/issue/kafka-server" {
  capabilities = ["update"]
}
EOF

vault policy write kafka-server kafka-server.hcl

vault write auth/token/roles/kafka-server \
	allowed_policies=kafka-server period=24h
This ends our configuration steps for Vault. We will move on to Kafka now.
Before anything, let’s get all the certificates that we created in the previous steps into a trust store so that Kafka can read it.
keytool -import -alias root-ca -trustcacerts -file root-ca.pem -keystore kafka-truststore.jks

keytool -import -alias kafka-int-ca -trustcacerts -file kafka-int-ca.pem -keystore kafka-truststore.jks
Some commands will ask for a password a few times during the rest of the blog. Just use changeme to keep using these same instructions as written here. You will also need to confirm that you trust the Root certificate when importing the Root certificate into the trust store.
Now that we have a trust store, let’s copy it to the Kafka home directory and continue:
cp *.jks kafka_*
cd kafka_*
Every node in our cluster will have its own certificate under the domain .servers.kafka.acme.com. We should now ask Vault to issue them for us.
To start, we create a new Vault Token with the server role (kafka-server) – We don’t want to keep using our root token to issue certificates. To do this, just type:
vault token create -role kafka-server
Copy the new token from the output and set the token environment variable:
export VAULT_TOKEN=(server vault token)
We now ask Vault to generate the certificate (and private key):
vault write -field certificate kafka-int-ca/issue/kafka-server \
    common_name=node-1.servers.kafka.acme.com alt_names=localhost \
    format=pem_bundle > node-1.pem
Note: We have assigned the alternative name localhost because, in this post, we will be running all the nodes on the same host but with different ports. The alternative name will guarantee that the TLS domain name checks will pass. In a production cluster, you should have real hostnames, so this shouldn’t be necessary.
The next two steps are just a bit of fiddling to convert the PEM format into the JKS format required by Kafka
openssl pkcs12 -inkey node-1.pem -in node-1.pem -name node-1 -export -out node-1.p12

keytool -importkeystore -deststorepass changeme \
    -destkeystore node-1-keystore.jks -srckeystore node-1.p12 -srcstoretype PKCS12
Next, we create a new server.properties file for each Kafka node:
cp config/server.properties config/server-1.properties

cat >> config/server-1.properties <<EOF

broker.id=1
listeners=SSL://:19093
advertised.listeners=SSL://localhost:19093
log.dirs=/tmp/kafka-logs-1

security.inter.broker.protocol=SSL

ssl.keystore.location=node-1-keystore.jks
ssl.keystore.password=changeme
ssl.key.password=changeme
ssl.truststore.location=kafka-truststore.jks
ssl.truststore.password=changeme

ssl.client.auth=required
authorizer.class.name=kafka.security.auth.SimpleAclAuthorizer

EOF
In this example, we will have two nodes only. The following are the instructions for the second one, but you can repeat this for as many nodes as you want.
vault write -field certificate kafka-int-ca/issue/kafka-server \
    common_name=node-2.servers.kafka.acme.com alt_names=localhost format=pem_bundle > node-2.pem

openssl pkcs12 -inkey node-2.pem -in node-2.pem -name node-2 -export -out node-2.p12

keytool -importkeystore -deststorepass changeme \
    -destkeystore node-2-keystore.jks -srckeystore node-2.p12 -srcstoretype PKCS12

cp config/server.properties config/server-2.properties

cat >> config/server-2.properties <<EOF

broker.id=2
listeners=SSL://:29093
advertised.listeners=SSL://localhost:29093
log.dirs=/tmp/kafka-logs-2

security.inter.broker.protocol=SSL

ssl.keystore.location=node-2-keystore.jks
ssl.keystore.password=changeme
ssl.key.password=changeme
ssl.truststore.location=kafka-truststore.jks
ssl.truststore.password=changeme

ssl.client.auth=required
authorizer.class.name=kafka.security.auth.SimpleAclAuthorizer

EOF
The final configuration is setting the ACL for our two nodes and for our client so that they can perform operations on the cluster.
As ACL configuration requires Zookeeper to be running, we start it with:
bin/zookeeper-server-start.sh config/zookeeper.properties &
In a Kafka Cluster, nodes use the same security model as any other actor, therefore we need to grant permissions to nodes in order for them to join the cluster. To grant these, we use the kafka-acls.sh command line tool like:
bin/kafka-acls.sh --authorizer-properties zookeeper.connect=localhost:2181 \
    --add --allow-principal User:CN=node-1.servers.kafka.acme.com --operation ALL --topic '*' --cluster
For the second node:
bin/kafka-acls.sh --authorizer-properties zookeeper.connect=localhost:2181 \
    --add --allow-principal User:CN=node-2.servers.kafka.acme.com --operation ALL --topic '*' --cluster
Lastly, we grant permissions to our client:
bin/kafka-acls.sh --authorizer-properties zookeeper.connect=localhost:2181 \
    --add --allow-principal User:CN=my-client.clients.kafka.acme.com --operation ALL --topic '*' --group '*'
This command grants any client holding a certificate with common name my-client.clients.kafka.acme.com access to all topics and consumer groups in Kafka.
Notice that we have granted permissions node by node, in order for them to join the cluster. Unfortunately, there’s no way to do this using a wildcard pattern like *.servers.kafka.acme.com. The same thing for clients. All names need to be explicit.
However, Kafka ACLs, in general, offers very granular controls and should cover most use cases. You should check out the Confluent documentation on ACLs. It explains in more details which resources and operations can be included in the ACL.
Finally, we can start our cluster:
bin/kafka-server-start.sh config/server-1.properties &
bin/kafka-server-start.sh config/server-2.properties &
And you should see two nice [KafkaServer id=X] started (Kafka. server. KafkaServer) messages on your terminal when the nodes are up.
Now it’s time to confirm that the client can connect to the cluster and are able to read and write messages to it.
The next steps are very similar to the ones we have done previously for the server-side.
We will create a new Vault Token with the kafka-client role. First, let’s make sure to use that we have enough privileges to do that. So, let’s instruct the CLI to use the Root token again by running:
unset VAULT_TOKEN
This will remove the environments variable that we set in the server configuration. CLI once again uses the root token from ~/. vault-token. Now that we have privileges again, we can:
vault token create -role kafka-client
export VAULT_TOKEN=(server vault token)
Here, we create our certificate with common name my-client.clients.kafka.acme.com and we convert the PEM certificate into JKS again:
vault write -field certificate kafka-int-ca/issue/kafka-client \
    common_name=my-client.clients.kafka.acme.com format=pem_bundle > client.pem

openssl pkcs12 -inkey client.pem -in client.pem -name client -export -out client.p12

keytool -importkeystore -deststorepass changeme \
    -destkeystore client-keystore.jks -srckeystore client.p12 -srcstoretype PKCS12
Now that we have the JKS, we can configure the Kafka CLI tools (producer and consumer) to use them. Here, the consumer and the producer are using the same certificate and private keys, but you could configure them to have different ones.
cp config/producer.properties config/producer-1.properties
cp config/consumer.properties config/consumer-1.properties

cat >> config/consumer-1.properties <<EOF

security.protocol=SSL
ssl.truststore.location=kafka-truststore.jks
ssl.truststore.password=changeme
ssl.keystore.location=client-keystore.jks
ssl.keystore.password=changeme
ssl.key.password=changeme

EOF

cat >> config/producer-1.properties <<EOF

security.protocol=SSL
ssl.truststore.location=kafka-truststore.jks
ssl.truststore.password=changeme
ssl.keystore.location=client-keystore.jks
ssl.keystore.password=changeme
ssl.key.password=changeme

EOF
We start the consumer and the producer in separate terminals:
bin/kafka-console-producer.sh --topic test --broker-list localhost:19093 \
    --producer.config config/producer-1.properties

bin/kafka-console-consumer.sh --topic test --bootstrap-server localhost:19093 \
    --consumer.config config/consumer-1.properties
And now, surprise! Whatever you write on the producer terminal should now appear on the consumer terminal!
Vault is a great tool to simplify the deployment of a PKI and as shown here, can be integrated with services like Kafka. Possibly in your environments, you have many more services that require TLS configuration and would greatly benefit from a PKI security model.
It’s important to say that we haven’t covered here any key rotation, CRL validation checks in Kafka and the security around Zookeeper. These are key are that need to be considered in your production deployment.
Additionally, the PKI hierarchy could be a lot more robust than the one described here. I’ve chosen this particular model for this post and it showcases nice Kafka and Vault capabilities like Intermediary CA and PKI roles. In your use case, however, could require a significantly different model.
Likewise, Kafka could also be configured to use other authentication mechanisms like SASL, but, at the same time, still benefit from the Vault PKI for generating server-side certificates, if this provides better security or integration with our current capabilities.
I hope this post gives you a good overview of the Vault’s PKI features and helps you when designing the security model of your services.
This blog is written exclusively by the OpenCredo team. We do not accept external contributions.


GOTOpia 2021 – Platform Engineering as a (Community) Service
Watch Nicki Watt’s talk on Platform Engineering as a (Community) Service at GOTOpia to learn what it takes to build a platform that is fit…