August 5, 2015 | Data Analysis, Data Engineering
A few weeks ago, we thought about building a Google analytics dashboard to give us easy access to certain elements of our Google Analytics web traffic. We saw some custom dashboards for bloggers, but nothing quite right for our goal, since we wanted the data on a big screen for everyone in the office to view.

One solution would of been to install some browser add-on which would refresh that page, but that was just too easy and too boring and I wanted to make customisations. So I decided to check out Google Embed API. You only have to serve your HTML files there with the code for dashboards and authorisation. Looks quite simple, although since I am a Python developer – I wanted to make it in Python.
Knowing that I will have to deal with multiple connections at once (making numerous queries for the dashboard) – I chose Tornado web framework which is almost ideal for such applications (and fun!). Making calls to external services asynchronously and waiting for response is what Tornado is really good at, and thus copes with multiple connections very well. By using it’s IO loop you can asynchronously query multiple external web services with only little footprint to your server’s performance. In this article – I will show you how to create this dashboard:
You can download full source code here. Pull requests with additional hacking are welcome! Or just fork it, make it better and share it 🙂
To get started with Google Analytics API you will have to do several things first:
Having this done, you can start creating your authentication module in Python. I have created mine in utilities/gaclient.py :
class GAcess:
   def __init__(self, scope=['https://www.googleapis.com/auth/analytics.readonly'], key_file_location=None,
                 service_account_email=None):
        if key_file_location is None:
            key_file_location = os.path.dirname(os.path.realpath(__file__)) + '/' + 'client_secrets.p12'
        # getting service object
        self.service = self.get_service('analytics', 'v3', scope, key_file_location,
                                        service_account_email)
    def get_service(self, api_name, api_version, scope, key_file_location,
                    service_account_email):
        """Get a service that communicates to a Google API.
        Args:
          api_name: The name of the api to connect to.
          api_version: The api version to connect to.
          scope: A list auth scopes to authorize for the application.
          key_file_location: The path to a valid service account p12 key file.
          service_account_email: The service account email address.
        Returns:
          A service that is connected to the specified API.
        """
        # reusing saved credentials
        storage = Storage("ta_saved_credentials.dat")
        http = httplib2.Http()
        credentials = storage.get()
        if credentials is None or credentials.invalid:
            print("credentials not found, authorizing")
            f = open(key_file_location, 'rb')
            key = f.read()
            f.close()
            credentials = SignedJwtAssertionCredentials(service_account_email, key, scope=scope)
            storage.put(credentials)
        else:
            print("credentials found")
            credentials.refresh(http)
        http = credentials.authorize(httplib2.Http())
        # Build the service object.
        service = build(api_name, api_version, http=http)
        return service
This client is not thread-safe so you will have to initiate connection for each call, and you can’t just keep your communication object in app’s settings for all request handlers to use (since then they would be sharing the same connection and bad things start to happen). At least good guy Google doesn’t count authentication requests as API calls so you still have your 10 queries per second which is more than enough for this little application.
You also probably saw that I am storing credentials for faster access.
Let’s define some handlers and get some useful information about our webpage. In urls.py file we are defining all URLS that route users to specific handlers (or views if you are familiar with Django):
url_patterns = [
    (r"/people-sources", web_handlers.PeopleSourcesHandler),
]
Then, we create a BaseHandler class in handlers/base.py:
class BaseHandler(CacheMixin, tornado.web.RequestHandler):
    """A class to collect common handler methods - all other handlers should
    subclass this one.
    """
    def prepare(self):
        super(BaseHandler, self).prepare()

    def get_current_user(self):
        """
        Gets secure cookie containing user email address. Secure cookies are encrypted.
        :return:
        """
        user = self.get_secure_cookie('tracker')
        if user:
            return user
        else:
            return None
Don’t pay attention to CacheMixin or ‘get_current_user’ functions for now. We are basically subclassing Tornado’s default RequestHandler which carries all information about current incoming request, application settings and other useful things. Having this class defined, let’s create another file in handlers folder, called web_handlers.py. We will keep dashboard’s web handlers here, so it will be easier to separate different functionalities if we decide that this app should grow. Define a handler and corresponding gaclient function for that:
in gaclient.py GAcess class add additional function:
def get_people_sources(self, profile_id=None, days=30, max_results=10):
    results = self.service.data().ga().get(
        ids='ga:' + profile_id,
        start_date='%sdaysAgo' % days,
        end_date='today',
        metrics='ga:sessions,ga:pageviews,ga:avgSessionDuration',
        dimensions='ga:source,ga:medium',
        sort='-ga:sessions',
        max_results=max_results).execute()
    return results
It will execute this query and return a dictionary which we will be using in our request handler.
Then, define your PeopleSourcesHandler:
class PeopleSourcesHandler(BaseHandler):
    def get(self):
        try:
            service_account = self.settings['service_account_email']
            self.service = GAcess(service_account_email=service_account,
                                  key_file_location=self.settings['key_file_location'])
            query_result = self.service.get_people_sources(profile_id=self.settings['ga_profile_id'],
                                                           days=self.settings['start_days_ago'])
            try:
                data = query_result['rows']
            except KeyError:
                self.set_status(400, reason='Failed to fetch people source data')
            else:
                # formatting seconds to more human readable version
                for row in data:
                    m, s = divmod(int(float(row[4])), 60)
                    h, m = divmod(m, 60)
                    row[4] = "%d:%02d:%02d" % (h, m, s)
                table_title = 'How did people found our pages?'
                headers = ['Source', 'Medium', 'Sessions', 'Page views', 'Avg. duration']
                return self.render_string('webhandler/data_table.html',
                                          data=data,
                                          table_title=table_title,
                                          headers=headers)
        except Exception as ex:
            self.set_status(403)
            return self.render_string('error.html',
                                      error=ex)
Notice, that we are taking ‘rows’ key from the query result, it’s the key which holds information that we need. This is a default place where you will be looking for results in your queries. Also, since API returns seconds
spent in your website. Luckily, there is an excellent function in python called divmod which is ideal for situations like this. Let’s change that to hours:minutes:seconds format which is a bit more pleasant for humans:
for row in data:
   m, s = divmod(int(float(row[4])), 60)
   h, m = divmod(m, 60)
   row[4] = "%d:%02d:%02d" % (h, m, s)
For front-end we will be using Tornado’s native template engine which is quite powerful (and weird) since you can basically do anything you want there (oh, you can’t easily implement coroutines there if you were thinking about it and I am not sure why you were thinking about it). From my Django days I know that it’s not really a good thing to put too much logic in your templates so we will keep them as simple as possible. Create a new directory in your project root called templates, then sub directory webhandler and add new template called data_table.html. Copy template code from here. We are making it as dynamic as possible so we can reuse it for all our tables. If you include base.html and index.html from my repo: you should see something like this:

If you keep adding more web handlers – you will notice that google python client only has a blocking version of it, so you have two options – use Requests module (or in our case we could use Tornado’s AsyncHTTPClient, which does the same, except it doesn’t block your application) or we could use native google-api-python-client and use Tornado’s function that allows executing these blocking calls in ThreadPoolExecutor. I chose going with the second option since there is quite an elegant way (you can find a blog post about it here) to do it, creating a decorator:
def unblock(f):
    @tornado.web.asynchronous
    @wraps(f)
    def wrapper(*args, **kwargs):
        self = args[0]
        def callback(future):
            self.write(future.result())
            self.finish()
        EXECUTOR.submit(
            partial(f, *args, **kwargs)
        ).add_done_callback(
            lambda future: tornado.ioloop.IOLoop.instance().add_callback(
                partial(callback, future)))
    return wrapper
Then, we just wrap our handler with it:
class PeopleSourcesHandler(BaseHandler):
    @unblock
    def get(self):
      …
And here it is, our blocking function becomes non-blocking. However, keep in mind that this feature delegates task to another thread.
Unblocking one call is quite good with that little snippet, although you can run into callback hell if you would want to create multiple callbacks in one handler. That’s where coroutines come in. Let’s imagine a scenario where we would want to list our most viewed pages, and view how many times they were shared on Facebook, Twitter and LinkedIn. All these social networks provide lightweight and fast endpoints for this specific operation. So, if we have a list of our top 10 pages, then to get that list we need 1 call to Google API, and then 30 calls to those social networks. How long it would take to do that in synchronous fashion? I don’t know and I probably don’t want to find out.
First, let’s define a routing rule for this:
(r"/top-pages", web_handlers.TopPagesHandler),
Then, create a function in our gaclient.py:
def get_top_pages(self, profile_id=None, days=30, max_results=10):
    results = self.service.data().ga().get(
        ids='ga:' + profile_id,
        start_date='%sdaysAgo' % days,
        end_date='today',
 	  metrics='ga:pageviews,
                ga:uniquePageviews,
                ga:avgTimeOnPage,ga:bounces,ga:entrances,ga:exits',
        dimensions='ga:pagePath',
        max_results=max_results,
        sort='-ga:pageviews').execute()
    return results
And a handler to call it:
class TopPagesHandler(BaseHandler):
@gen.coroutine
def get(self):
try:
service_account = self.settings['service_account_email']
self.service = GAcess(service_account_email=service_account,
key_file_location=self.settings['key_file_location'])
query_result = self.service.get_top_pages(profile_id=self.settings['ga_profile_id'],
days=self.settings['start_days_ago'])
try:
data = query_result['rows']
except KeyError:
self.set_status(400, reason='Failed to fetch top pages data')
else:
# formatting seconds to more human readable version and creating urls list
urls = []
for row in data:
m, s = divmod(int(float(row[3])), 60)
h, m = divmod(m, 60)
row[3] = "%d:%02d:%02d" % (h, m, s)
urls.append(self.settings['website'] + row[0])
# getting social networks shares for our precious blog
facebook_shares, twitter_shares, linkedin_shares = yield [get_facebook_results(urls),
get_twitter_results(urls),
get_linkedin_results(urls)]
# updating list with data
for idx, row in enumerate(data):
row.append(facebook_shares[idx])
row.append(twitter_shares[idx])
row.append(linkedin_shares[idx])
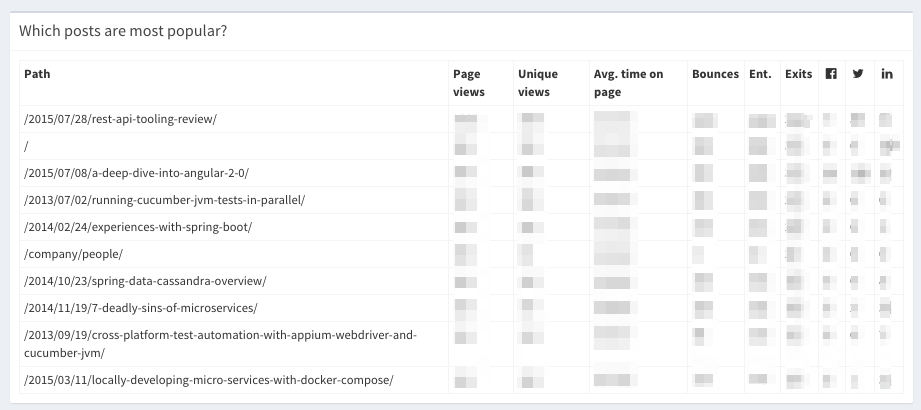
headers = ['Path', 'Page views', 'Unique views', 'Avg. time on page', 'Bounces', 'Ent.', 'Exits',
'', '',
'']
table_title = 'Which posts are most popular?'
return self.render('webhandler/data_table.html',
data=data,
table_title=table_title,
headers=headers,
website=self.settings['website'])
except Exception as ex:
self.set_status(403)
return self.render('error.html',
error=ex)
Interesting part here is yielding a list of multiple coroutines:
# getting social networks shares for our precious blog
facebook_shares, twitter_shares, linkedin_shares = yield [get_facebook_results(urls), get_twitter_results(urls),        						       get_linkedin_results(urls)]
This way Tornado is executing them all at once because basically it’s not a CPU intensive task, it’s making a lot of calls to APIs in parallel. Define all these functions in utilities/common.py since they don’t belong in web_handlers.py. Facebook shares functions looks like this:
@gen.coroutine
def get_facebook_results(urls):
    """
    Gets statistics for given URLs in facebook, returns a list with results
    :param urls: list of urls
    :return: list with integers (how many shares)
    """
    http_client = AsyncHTTPClient()
    futures_list = []
    results = []
    for url in urls:
        futures_list.append(http_client.fetch("http://graph.facebook.com/?id="+url))
    responses = yield futures_list
    for response in responses:
        try:
            results.append(json.loads(response.body.decode('utf-8'))['shares'])
        except KeyError:
            results.append(0)
        except Exception as ex:
            print(ex)
            results.append(0)
    return results
Here we are creating a list of http_client instances and then yielding them together, so Tornado will execute them in parallel. Then, we will be extracting ‘shares’ values from these links and returning it back to our web handler function.
It takes several seconds to load, but results are really appealing:
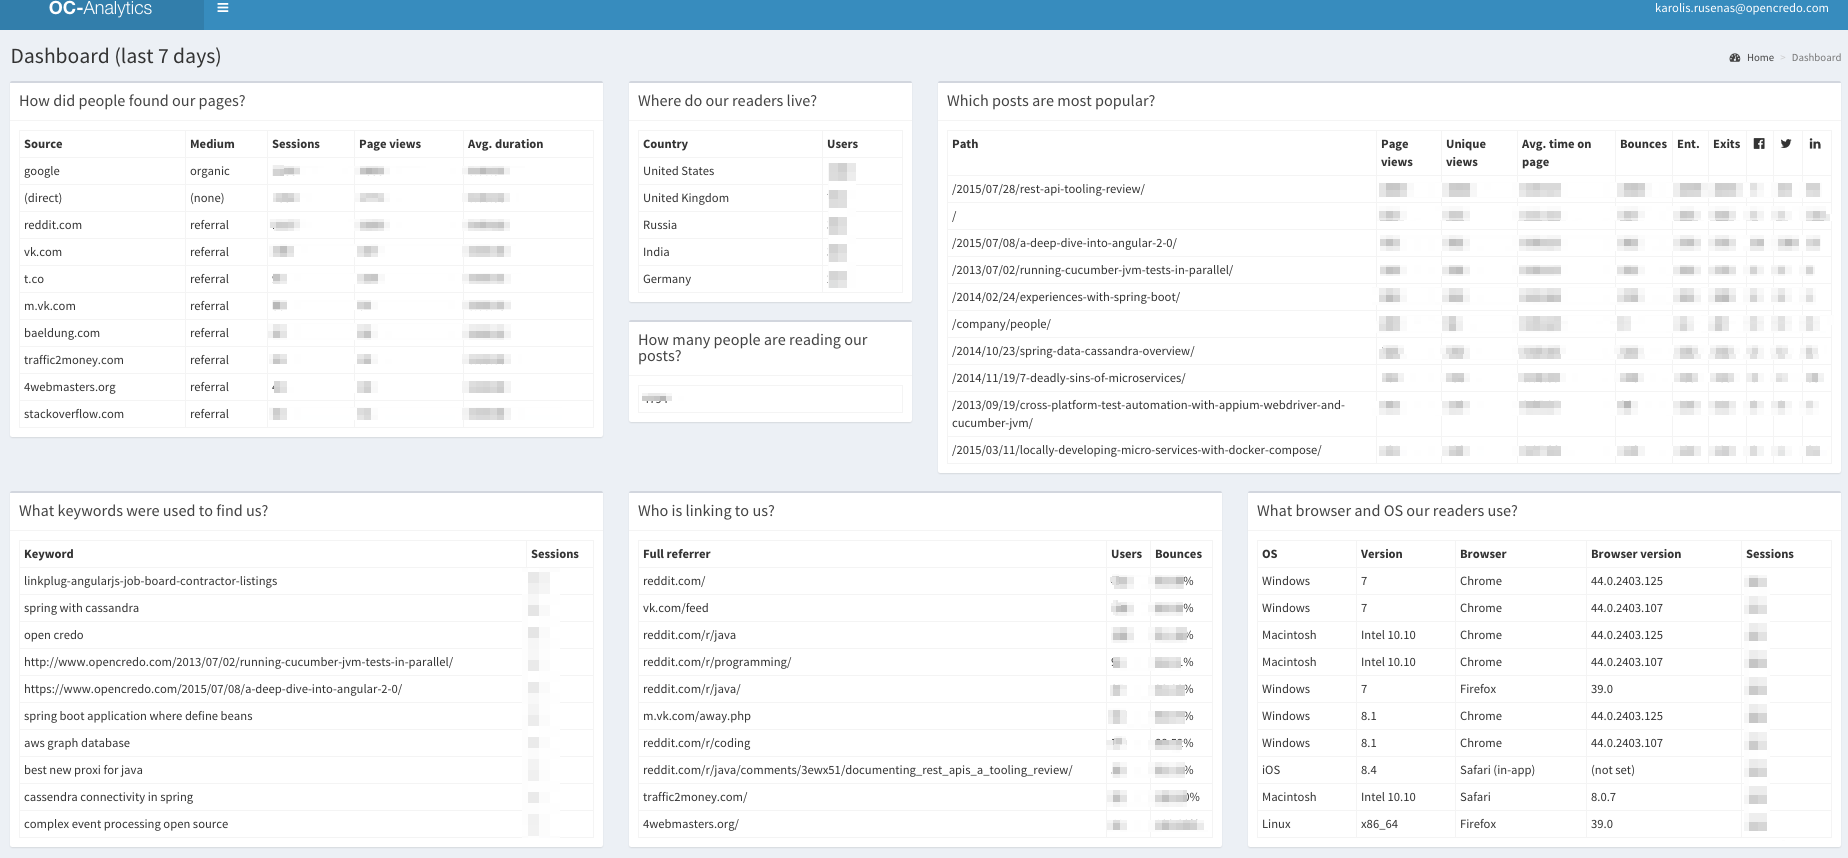
Here we have our improved analytics dashboard. It was quite easy to get it, wasn’t it? Also, look at the code structure, it’s like writing your function from top to bottom without even thinking about callbacks and futures. The code is really explicit and you are always aware of what is happening.
Since Google API only allows 10 requests per second – we have to introduce some kind of caching. You can find CacheMixin in utilities/cache.py folder, what it does is basically check whether the request was successful and if it was – caches it to Redis.
I chose Redis because it can be easily integrated into any Python application and it’s also available on OpenShift. You only have to add additional decorators to your “get” methods:
class TopPagesHandler(BaseHandler):
    @cache(CACHE_EXPIRES)  # set the cache expires in your settings
    @gen.coroutine
You probably want to incorporate authentication/authorisation to your application? Tornado helps a lot here since it already has integrations with major players in this field. Use your google developer console to enable G+ API (find it under APIs section in your navigation bar) and then create Client ID for web application. Keep in mind that Redirect URL should point either to your web server or to your “http://localhost” if you you are developing! It should match your application’s redirect URL as well.
For our application we will be using GoogleOAuth2Mixin and have an ability whitelist people from our chosen domain. First, we have to define a handler that will be responsible for login:
class GAuthLoginHandler(BaseHandler, tornado_auth.GoogleOAuth2Mixin):
    @tornado.gen.coroutine
    def get(self):
        # if user is authenticated - redirect them
        if self.get_current_user():
            self.redirect('/')
            return
        if self.get_argument('code', False):
            user = yield self.get_authenticated_user(redirect_uri=self.settings["google_redirect_url"],
                                                     code=self.get_argument('code'))
            if not user:
                self.clear_all_cookies()
                raise tornado.web.HTTPError(500, 'Google authentication failed')
            access_token = str(user['access_token'])
            http_client = self.get_auth_http_client()
            response = yield http_client.fetch(
                'https://www.googleapis.com/oauth2/v1/userinfo?access_token='+access_token)
            # decoding bytecode to utf-8
            user = json.loads(response.body.decode('utf-8'))
            self.set_secure_cookie('tracker', user['email'])
            self.redirect('/')
            return
        elif self.get_secure_cookie('tracker'):
            self.redirect('/')
            return
        else:
            yield self.authorize_redirect(
                redirect_uri=self.settings["google_redirect_url"],
                client_id=self.settings['google_oauth']['key'],
                scope=['email'],
                response_type='code',
                extra_params={'approval_prompt': 'auto',
                              'hd': self.settings['allowed_domain']})  # passing 'hd' parameter to whitelist this domain
We are storing user’s email secure cookie which is supposed to be secure (what a relief). You should also notice that we are passing ‘hd’ parameter to whitelist our chosen domain. Then, we define some more URL routes for users:
(r"/login-page", web_handlers.LoginPage),
(r"/login", GAuthLoginHandler),
(r"/logout", AuthLogoutHandler),
login-page here acts as a place were unregistered users can wander around without being automatically redirected to Google’s auth page. Now, go to your web_handlers.py and add new decorator over your every (OK, except LoginPage handler) handler get function: @web.authenticated. That’s it, authentication enabled.
You are probably tired by now but we are almost finished :). Since OpenShift Origin (with Kubernetes and all the new good things) isn’t live in RedHat’s online PaaS – we will be using current online version which is cool as well. You can get three gears for free what is more than enough for our little application. Just go here: https://www.openshift.com/products/online for a free account. Then, create a native Python 3.3 application (or you can do it from command line using rhc client). Add Redis cartridge to your application:
rhc add-cartridge http://cartreflect-claytondev.rhcloud.com/reflect?github=smarterclayton/openshift-redis-cart
What’s different about Tornado applications in OpenShift is that we should use Tornado (to enable our coroutines and other good things) as an HTTP server and override OpenShift WSGI server. To do that – create new app.py file inside your project’s root:
from utilities.cache import RedisCacheBackend
import redis
import tornado
from run import TornadoApplication
if __name__ == '__main__':
    ip = os.environ['OPENSHIFT_PYTHON_IP']
    port = int(os.environ['OPENSHIFT_PYTHON_PORT'])
    app = TornadoApplication()
    # overriding default redis settings with openshift ones.
    app.redis = redis.Redis(host=os.environ['OPENSHIFT_REDIS_HOST'], port=os.environ['OPENSHIFT_REDIS_PORT'], password=os.environ['REDIS_PASSWORD'])
    app.cache = RedisCacheBackend(app.redis)
    # overriding google oauth callback url
    app.settings['google_redirect_url'] = 'http://%s/login' % os.environ['OPENSHIFT_APP_DNS']
    http_server = tornado.httpserver.HTTPServer(app)
    http_server.listen(port=port, address=ip)
    tornado.ioloop.IOLoop.instance().start()
Here we grab some parameters from OpenShift environment variables for Redis and also for API callbacks. I should mention again that your redirect value in app.settings[‘google_redirect_url’] should be the same as the one in your service account which you have created in google’s developer console.
This function is also starting tornado’s IOLoop so our web server is started. You can now go and check out your application online! If it fails to start – you can use rhc ssh [application_name] to quickly connect to your application and go to ‘logs’ folder for some information.
That’s it. Tornado is fun, you should use more of it!
This blog is written exclusively by the OpenCredo team. We do not accept external contributions.
SHARE


Yow! London – Searching for Research Fraud in OpenAlex with Graph Data Science (Recording)
Check out our Lead Consultant Ebru Cucen and Sage Publishing Data Scientist Adam Day co-present on “Research Fraud Detection in OpenAlex with Graph Data Science”…